23 KiB
NFS网络文件共享
NFS(Network File System)是一种分布式文件系统协议,最初由Sun Microsystems在1984年开发。NFS允许计算机在网络上共享文件和目录,就像这些文件和目录位于本地计算机上一样。它广泛应用于UNIX和类UNIX系统中,但也可以在其他操作系统上使用,如Windows和macOS。
NFS简介与RPC简介
NFS服务介绍
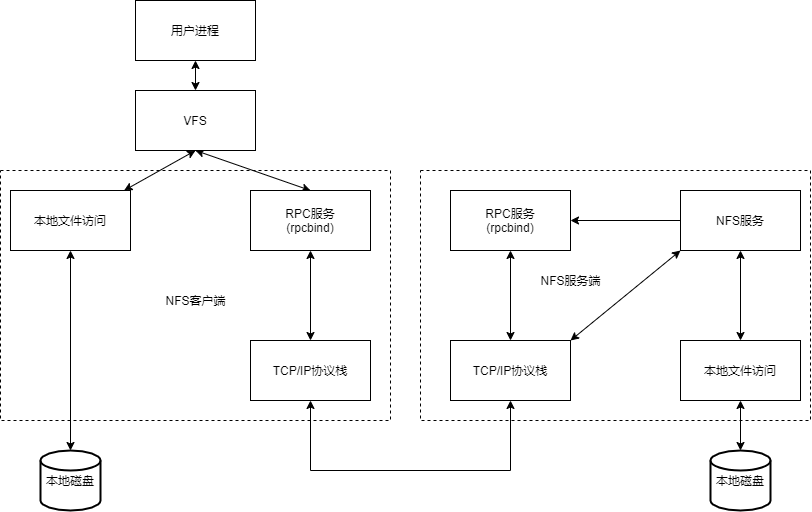
NFS是一种网络协议,NFS依赖RPC才能工作。
NFS 的基本原则是“容许不同的客户端及服务端通过一组RPC分享相同的文件系统”,它是独立于操作系统,容许不同硬件及操作系统的系统共同进行文件的分享。可以理解为把一个电脑上的硬盘挂载到另一个电脑上使用,另一个电脑能够像使用自己本地硬盘使用挂载的硬盘。
NFS在文件传送或信息传送过程中依赖于RPC协议。RPC,远程过程调用 (Remote Procedure Call) 是能使客户端执行其他系统中程序的一种机制。NFS本身是没有提供信息传输的协议和功能的,但NFS却能让我们通过网络进行资料的分享,这是因为NFS使用了一些其它的传输协议。而这些传输协议用到这个RPC功能的。可以这么理解RPC和NFS的关系:NFS是一个文件系统,而RPC是负责信息的传输。
RPC协议介绍
RPC(Remote Procedure Call)远程过程调用,它是一种通过网络从远程计算机程序上请求服务,而不需要了解底层网络技术的协议。其工作在TCP/UDP的111端口。建立在Socket之上的,主要是简化编程的工作在底层提供网络之间的通信。
RPC采用客户机/服务器模式。请求程序就是一个客户机,而服务提供程序就是一个服务器。首先,客户机调用进程发送一个有进程参数的调用信息到服务进程,然后等待应答信息。在服务器端,进程保持睡眠状态直到调用信息的到达为止。当一个调用信息到达,服务器获得进程参数,计算结果,发送答复信息,然后等待下一个调用信息,最后,客户端调用进程接收答复信息,获得进程结果,然后调用执行继续进行。
RPC 远程过程调度
- NFS 协议本身并没有网络传输功能,而是基于远程过程调用协议实现的
- 提供一个面向过程的远程服务的接口
- 可以通过网络从远程主机程序上请求服务,而不需要了解底层网络技术的协议
- 工作在 OSI 模型的会话层,它可以为遵从 RPC 协议应用层协议提供端口注册功能
- 事实上,有很多服务(NFS 和 NIS 等)都可以向 RPC 注册端口
- RPC 使用网络端口 111 来监听客户端的请求
RPC 协议模型
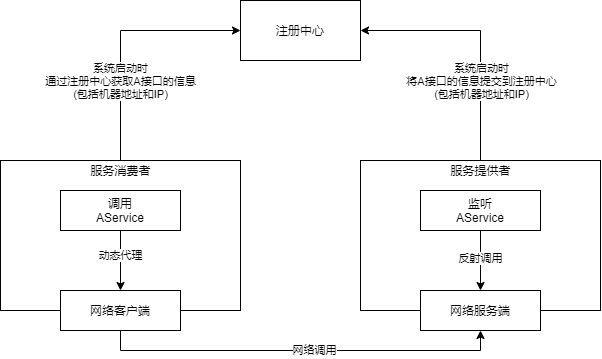
- 基于 rpc 的服务(此处是指 nfs 服务,在别处有可能是代表其他服务)在启动时向 portmapper 注册端口
- 基于 rpc 的客户端联系服务端 portmapper 询问服务的端口号
- portmapper 告知客户端基于 rpc 服务使用的端口号
- 基于 rpc 的客户端访问被告知单某基于 rpc 服务的端口
- 基于 rpc 的服务响应客户端的请求
NFS工作流程
- 首先服务器端启动RPC服务,并开启111端口
- 然后还需要服务器端启动NFS服务,并向RPC注册端口信息
- 客户端启动RPC(portmap服务),向服务端的RPC(portmap)服务请求服务端的NFS端口
- 服务端的RPC(portmap)服务反馈NFS端口信息给客户端。
- 客户端通过获取的NFS端口来建立和服务端的NFS连接并进行数据的传输。

挂载原理/过程
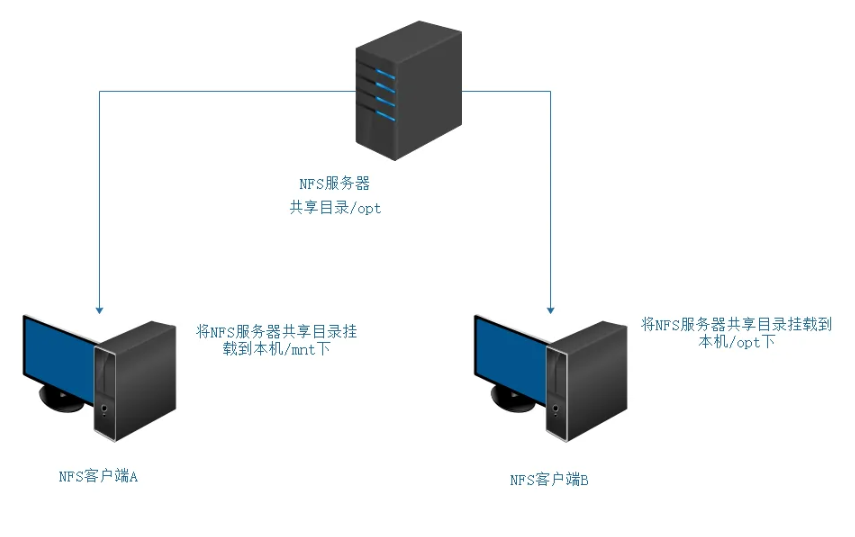
当我们在NFS服务器设置好一个共享目录/opt 后,其他人是有权访问/opt这个共享目录的,NFS客户端就可以将这个目录挂载到自己文件系统的某个挂载点(这个挂载点可以自己定义),路径不同也可以;如下图客户端A与客户端B挂载的目录就不相同。并且挂载好后我们在本地能够看到服务端/opt下的所有数据。

NFS共享实战
准备工作
一、服务器信息:
主机	IP	服务	端口
服务端: 192.168.88.10	nfs	rpc	2049 111
客户端: 192.168.88.20 	nfs rpc	2049 111
二、关闭防火墙
# 关闭防火墙
systemctl stop firewalld
# 禁止防火墙开机自启
systemctl disable firewalld
如果必须开启防火墙,我们可以通过firewalld放行nfs和rpc服务
# 开启nfs和rpc服务
firewall-cmd --permanent --add-service=nfs
firewall-cmd --permanent --add-service=rpc-bind

# 重载防火墙规则
firewall-cmd --reload
三、关闭SELinux
setenforce 0
四、检查内核是否支持
modinfo nfs
NFS软件介绍
相关软件包:nfs-utils、rpcbind
端口:2049(nfsd),其它端口由 portmap(111)分配。CentOS 6 开始 portmap 进程由 rpcbind 代替
NFS 服务主要进程:
- rpc.nfsd 最主要的 NFS 进程, 管理客户端是否可登录
- rpc.mountd 挂载和卸载 NFS 文件系统,包括权限管理
- rpc.lockd 非必要,管理文件锁,避免同时写出错
- rpc.statd 非必要, 检查文件-致性, 可修复文件
- 日志:/var/lib/nfs
配置文件:
- /etc/exports
- /etc/exports.d/*.exports
NFS部署
一、安装rpcbind和nfs服务
[root@localhost ~]# yum -y install rpcbind nfs-utils
二、启动服务
[root@localhost ~]# systemctl enable --now rpcbind
[root@localhost ~]# systemctl enable --now nfs-server
Created symlink /etc/systemd/system/multi-user.target.wants/nfs-server.service → /usr/lib/systemd/system/nfs-server.service.
三、验证服务
[root@localhost ~]# systemctl status rpcbind
● rpcbind.service - RPC Bind
     Loaded: loaded (/usr/lib/systemd/system/rpcbind.service; enabled; preset: enabled)
     Active: active (running) since Thu 2025-01-09 10:54:21 CST; 51s ago
TriggeredBy: ● rpcbind.socket
       Docs: man:rpcbind(8)
   Main PID: 26847 (rpcbind)
      Tasks: 1 (limit: 10888)
     Memory: 1.6M
        CPU: 28ms
     CGroup: /system.slice/rpcbind.service
             └─26847 /usr/bin/rpcbind -w -f

Jan 09 10:54:21 localhost.localdomain systemd[1]: Starting RPC Bind...
Jan 09 10:54:21 localhost.localdomain systemd[1]: Started RPC Bind.
[root@localhost ~]# systemctl status nfs-server
● nfs-server.service - NFS server and services
     Loaded: loaded (/usr/lib/systemd/system/nfs-server.service; enabled; preset: disabled)
     Active: active (exited) since Thu 2025-01-09 10:54:39 CST; 42s ago
       Docs: man:rpc.nfsd(8)
             man:exportfs(8)
    Process: 27817 ExecStartPre=/usr/sbin/exportfs -r (code=exited, status=0/SUCCESS)
    Process: 27818 ExecStart=/usr/sbin/rpc.nfsd (code=exited, status=0/SUCCESS)
    Process: 27836 ExecStart=/bin/sh -c if systemctl -q is-active gssproxy; then systemctl reload gssproxy ; fi (code=exited, st>
   Main PID: 27836 (code=exited, status=0/SUCCESS)
        CPU: 35ms

Jan 09 10:54:38 localhost.localdomain systemd[1]: Starting NFS server and services...
Jan 09 10:54:39 localhost.localdomain systemd[1]: Finished NFS server and services.

# 端口号验证
[root@localhost ~]# ss -nlt
State          Recv-Q         Send-Q                 Local Address:Port                  Peer Address:Port        Process
LISTEN         0              64                           0.0.0.0:2049                       0.0.0.0:*
LISTEN         0              128                          0.0.0.0:22                         0.0.0.0:*
LISTEN         0              4096                         0.0.0.0:111                        0.0.0.0:*
LISTEN         0              4096                         0.0.0.0:56973                      0.0.0.0:*
LISTEN         0              64                           0.0.0.0:46725                      0.0.0.0:*
LISTEN         0              4096                         0.0.0.0:20048                      0.0.0.0:*
LISTEN         0              64                              [::]:2049                          [::]:*
LISTEN         0              128                             [::]:22                            [::]:*
LISTEN         0              4096                            [::]:111                           [::]:*
LISTEN         0              64                              [::]:35931                         [::]:*
LISTEN         0              4096                            [::]:35405                         [::]:*
LISTEN         0              4096                            [::]:20048                         [::]:*
NFS配置文件格式
/dir 主机 1(opt1,opt2) 主机 2(opt1,opt2)
- 主机格式
- 单个主机: ipv4, ipv6, FQDN
- IP networks: 两种掩码格式均支持
- 172.18.0.0/255.255.0.0
- 172.18.0.0/16
- wildcards:主机名通配,例如*.iproute.cn,IP 不可以
- netgroups: NIS 域的主机组,@group_ name
- anonymous:表示使用*通配所有客户端
- 选项格式
- 默认选项
- (ro,sync,root_squash, no_all_squash)
- ro, rw
- 只读和读写
- async
- 异步,数据变化后不立即写磁盘,等磁盘空闲时再写入,性能高
- sync
- 同步(1.0.0 后为默认),数据在请求时立即写入共享存储磁盘
- root_squash
- 远程 root 映射为 nfsnobody(默认),UID 为 65534,Centos8 为 nobody, 早期版本是 4294967294 (nfsnobody)
- no_root_squash
- 远程 root 映射成 root 用户
- all_squash
- 所有远程用户(包括 root)都变成 nfsnobody , Centos8 为 nobody
- no_all_squash
- 保留共享文件的 UID 和 GID (默认)
- anonuid 和 anongid
- 指明匿名用户映射为特定用户 UID 和组 GID,而非 nfsnobody ,可配合 all_squash 使用
- 默认选项
NFS相关工具
rpcinfo
rpcinfo 工具可以查看 RPC 相关信息
查看注册在指定主机的 RPC 程序
rpcinfo -p hostname
查看 rpc 注册程序
rpcinfo -s hostname
exportfs
可用于管理 NFS 导出的文件系统
常见选项:
- -v:查看本机所有 NFS 共享
- -r:重读配置文件,并共享目录
- -a:输出本机所有共享
- -au:停止本机所有共享
showmount
常见用法:
showmount -e hostname
配置共享目录
服务端上创建共享目录;这里我们要挂载的目录是/myshare
[root@localhost ~]# mkdir -p /myshare
手动挂载案例
# 服务端
[root@localhost ~]# vim /etc/exports
/myshare 192.168.88.0/24
[root@localhost ~]# cd /myshare
[root@localhost myshare]# echo "hello" > file
[root@localhost ~]# systemctl stop firewalld
[root@localhost ~]# setenforce 0

# 客户端:
[root@localhost ~]# yum install -y nfs-utils rpcbind
[root@localhost ~]# showmount -e 192.168.88.10
Export list for 192.168.88.10:
# 虽然我们自己配置共享了,但是没有重读配置文件,所以读不到

# 服务端:
[root@localhost myshare]# exportfs -r
exportfs: No options for /myshare 192.168.88.0/24: suggest 192.168.88.0/24(sync) to avoid warning
[root@localhost myshare]# exportfs -v
/myshare        192.168.88.0/24(sync,wdelay,hide,no_subtree_check,sec=sys,ro,secure,root_squash,no_all_squash)

# 客户端:
[root@localhost ~]# showmount -e 192.168.88.10
Export list for 192.168.88.10:
/myshare 192.168.88.0/24
[root@localhost ~]# mkdir /mnt/nfs
[root@localhost ~]# mount -t nfs 192.168.88.10:/myshare /mnt/nfs
[root@localhost ~]# df -h
Filesystem              Size  Used Avail Use% Mounted on
devtmpfs                4.0M     0  4.0M   0% /dev
tmpfs                   872M     0  872M   0% /dev/shm
tmpfs                   349M  5.2M  344M   2% /run
/dev/mapper/rl-root      17G  1.7G   16G  10% /
/dev/nvme0n1p1          960M  261M  700M  28% /boot
tmpfs                   175M     0  175M   0% /run/user/0
192.168.88.10:/myshare   17G  1.7G   16G  10% /mnt/nfs
[root@localhost ~]# cd /mnt/nfs/
[root@localhost nfs]# ls
file
[root@localhost nfs]# cat file
hello
[root@localhost ~]# rm -f file
rm: cannot remove 'file': Read-only file system
[root@localhost ~]# umount /mnt/nfs
# 现在是只读模式,想要修改模式要去改配置文件,先卸载挂载

# 服务端:
[root@localhost ~]# vim /etc/exports
/myshare 192.168.88.0/24(rw,sync,root_squash,no_all_squash)
[root@localhost myshare]# exportfs -v
/myshare        192.168.88.0/24(sync,wdelay,hide,no_subtree_check,sec=sys,ro,secure,root_squash,no_all_squash)
[root@localhost myshare]# exportfs -r
[root@localhost myshare]# exportfs -v
/myshare        192.168.88.0/24(sync,wdelay,hide,no_subtree_check,sec=sys,rw,secure,root_squash,no_all_squash)

# 客户端:
[root@localhost ~]# showmount -e 192.168.88.10
Export list for 192.168.88.10:
/myshare 192.168.88.0/24
[root@localhost ~]# mount -t nfs 192.168.88.10:/myshare /mnt/nfs
[root@localhost ~]# df -h
Filesystem              Size  Used Avail Use% Mounted on
devtmpfs                4.0M     0  4.0M   0% /dev
tmpfs                   872M     0  872M   0% /dev/shm
tmpfs                   349M  5.2M  344M   2% /run
/dev/mapper/rl-root      17G  1.7G   16G  10% /
/dev/nvme0n1p1          960M  261M  700M  28% /boot
tmpfs                   175M     0  175M   0% /run/user/0
192.168.88.10:/myshare   17G  1.7G   16G  10% /mnt/nfs
[root@localhost ~]# cd /mnt/nfs/
[root@localhost nfs]# rm -f file
rm: cannot remove 'file': Permission denied
# 虽然给了rw权限,但是目录权限被linux控制

# 服务端:
[root@localhost myshare]# ll -d /myshare/
drwxr-xr-x. 2 root root 18 Jan  9 15:59 /myshare/
[root@localhost myshare]# chmod a+w /myshare/

# 客户端:
[root@localhost nfs]# rm -f file
[root@localhost nfs]# echo "Hello, This is server2" > file
[root@localhost nfs]# ll
total 4
-rw-r--r--. 1 nobody nobody 23 Jan  9 16:14 file
[root@localhost nfs]# su - user01
[user01@localhost ~]$ cd /mnt/nfs/
[user01@localhost nfs]$ touch file1
[user01@localhost nfs]$ ll
总用量 4
-rw-r--r-- 1 nfsnobody nfsnobody 6 7月  16 22:08 file
-rw-rw-r-- 1 user01    user01    0 7月  16 22:11 file1

# 服务端:
[root@localhost myshare]# ll
总用量 4
-rw-r--r--. 1 nfsnobody nfsnobody 6 7月  16 22:08 file
-rw-rw-r--. 1      1000      1000 0 7月  16 22:11 file1
[root@localhost myshare]# useradd -u1000 zhangsan
[root@localhost myshare]# ll
总用量 4
-rw-r--r--. 1 nfsnobody nfsnobody 6 7月  16 22:08 file
-rw-rw-r--. 1 zhangsan  zhangsan  0 7月  16 22:11 file1
[root@localhost ~]# vim /etc/exports
/myshare 192.168.88.0/24(rw,sync,no_root_squash,all_squash)
[root@localhost myshare]# exportfs -r
[root@localhost myshare]# exportfs -v
/myshare        192.168.88.0/24(sync,wdelay,hide,no_subtree_check,sec=sys,rw,secure,no_root_squash,all_squash)

# 客户端:
[root@localhost ~]# umount /mnt/nfs/
[root@localhost ~]# mount -t nfs 192.168.88.10:/myshare /mnt/nfs
[root@localhost ~]# df -h
[root@localhost ~]# cd /mnt/nfs/
[root@localhost ~]# touch file{2,3}
[root@localhost nfs]# ll
总用量 4
-rw-r--r-- 1 nfsnobody nfsnobody 6 7月  16 22:08 file
-rw-rw-r-- 1 user01    user01    0 7月  16 22:11 file1
-rw-r--r-- 1 nfsnobody nfsnobody 0 7月  16 22:26 file2
-rw-r--r-- 1 nfsnobody nfsnobody 0 7月  16 22:26 file3
mount.nfs挂载选项
客户端 NFS 挂载
NFS 相关的挂载选项:man 5 nfs
- fg:(默认)前台挂载,失败直接退出
- bg:后台挂载,失败后会再次尝试
- hard:(默认)持续请求
- soft:非持续请求
- intr 和 hard 配合:请求可中断
- rsize 和 wsize:一次读和写数据最大字节数,rsize=32768
- nosuid:忽略文件的suid特殊权限
- _netdev:提示标志,表示挂载的是网络设备,启动时候先简历网络连接,再挂载设备
- noexec:表示不允许执行
提示:基于安全考虑,建议使用nosuid,_netdev,noexec挂载选项
范例:临时挂载 NFS 共享
mount -o rw,nosuid,fg,hard,intr 192.168.88.10:/myshare /mnt/nfs
范例:开机挂载
vim /etc/fstab
192.168.88.10:/myshare   /mnt/nfs    nfs    defaults,_netdev  0 0
自动挂载
由于NFS的应用场景,需要我们挂载远程硬盘本地使用,所以我们可以使用autofs服务按需要挂载外围设备,NFS共享等,并在空闲5分钟后后自动卸载。
主要用于客户端上,在客户端上自动挂载服务端提供的共享目录。
相关包和文件
- 软件包: autofs
- 服务文件: /usr/lib/systemd/system/autofs.service
- 配置文件: /etc/auto.master
客户端安装:
[root@localhost ~]# yum install -y autofs
[root@localhost ~]# systemctl enable --now autofs
配置autofs
autofs 的主要配置分为 主配置文件 和 挂载映射文件。
**主配置文件 **
/etc/auto.master 是 autofs 的主配置文件,用于定义挂载点及其对应的映射文件。
示例:
/mnt/nfs /etc/auto.nfs --timeout=300
配置说明:
/mnt/nfs:挂载点的根目录。/etc/auto.nfs:挂载点对应的映射文件。--timeout=300:挂载超时时间(单位为秒),300 秒后未访问的挂载点将自动卸载。
注意:修改 /etc/auto.master 后需要重新加载 autofs 服务。
systemctl reload autofs
挂载映射文件 /etc/auto.nfs
挂载映射文件定义了具体的 NFS 挂载规则。
示例:
share1    -fstype=nfs4,rw,soft    nfs-server:/export/share1
share2    -fstype=nfs4,ro,hard    nfs-server:/export/share2
配置说明:
share1和share2:挂载点名称,最终挂载路径为/mnt/nfs/share1和/mnt/nfs/share2。-fstype=nfs4: 指定文件系统类型为 NFSv4。rw/ro:挂载权限,rw表示读写,ro表示只读。- soft/hard:
- soft:如果 NFS 服务器未响应,客户端将返回错误。
- hard:客户端将无限期尝试连接,直到服务器恢复正常。
nfs-server:/export/share1:NFS 服务器地址及其共享路径。
注意:修改挂载映射文件后无需重启服务,autofs 会动态加载。
挂载案例
一、创建挂载点目录
[root@localhost ~]# mkdir /mnt/nfs
二、配置autofs自动挂载
# 编辑auto.master主配置文件
[root@localhost ~]# vim /etc/auto.master
/mnt/nfs    /etc/auto.nfs
[root@localhost ~]# systemctl restart autofs

# 编辑挂载映射文件
[root@localhost ~]# vim /etc/auto.nfs
share   -fstype=nfs4,rw,soft    192.168.88.10:/myshare
三、验证挂载
# 访问挂载点以触发自动挂载
[root@localhost ~]# ls /mnt/nfs/share
dir  file  file1
[root@localhost ~]# cd /mnt/nfs/share/
[root@localhost share]# ls
dir  file  file1
[root@localhost share]# cat file
Hello, This is server2
其他配置选项
在挂载映射文件中可以使用多种选项,以下是常用参数的详细说明:
文件系统类型选项 (-fstype=)
- nfs:适用于 NFSv3 文件系统。
- nfs4:适用于 NFSv4 文件系统。
挂载选项
- rw:读写权限。
- ro:只读权限。
- soft:允许客户端在超时后返回错误。
- hard:客户端会一直尝试连接,直到服务器恢复正常。
- intr:允许中断挂载操作(NFSv3 使用)。
- timeo=:超时时间(默认 600 分钟)。
- bg:后台挂载操作。
变量支持
映射文件中可以使用变量。例如:
* -fstype=nfs4,rw 192.168.88.10:/myshare/&
在此配置中,* 代表通配符,& 将被替换为对应挂载点名称。例如,访问 /mnt/nfs/test 时将挂载 192.168.88.10:/myshare/test
实战案例
将NFS的共享目录,通过autofs 发布出来,做为远程主机用户的家目录

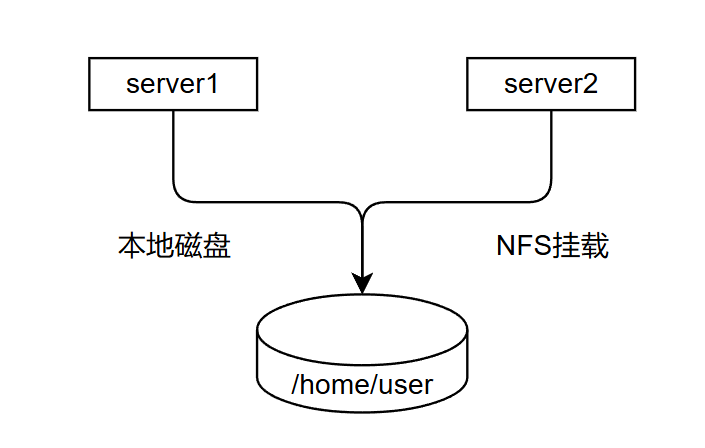
环境准备
将server1中的用户家目录共享出来,server2在登录相同用户的时候,看到的家目录下的文件是一致的
实验过程
一、NFS服务器(server1)创建用户和对应的目录,将用户user01的家目录共享出来
[root@localhost ~]# mkdir /data
[root@localhost ~]# useradd -d /data/user01 user01
[root@localhost ~]# id user01
uid=1000(user01) gid=1000(user01) groups=1000(user01)
[root@localhost ~]# vim /etc/exports
[root@localhost ~]# cat /etc/exports
# /myshare 192.168.88.0/24(rw,sync,root_squash,no_all_squash)
/data/user01 192.168.88.0/24(rw,sync,anonuid=1000,anongid=1000,all_squash)
[root@localhost ~]# exportfs -r
[root@localhost ~]# exportfs -v
/data/user01    192.168.88.0/24(sync,wdelay,hide,no_subtree_check,anonuid=1000,anongid=1000,sec=sys,rw,secure,root_squash,all_squash)
二、在NFS客户端(server2)中配置autofs
[root@localhost ~]# vim /etc/auto.master
/-  /etc/auto.user
[root@localhost ~]# vim /etc/auto.user
[root@localhost ~]# cat /etc/auto.user
/data/user01  -fstype=nfs4,rw,soft    192.168.88.10:/data/user01
[root@localhost ~]# systemctl restart autofs
三、在server2中创建user01用户
[root@localhost ~]# useradd -d /data/user01 -u 1000 user01
useradd: warning: the home directory /data/user01 already exists.
useradd: Not copying any file from skel directory into it.
四、测试
# 在server1中,登录到user01用户创建一个文件
[root@localhost ~]# su - user01
[user01@localhost ~]$ echo "The file is created by server1-user01" > file

# 在server2中,登录到user01用户查看是否共享了该文件
[root@localhost ~]# su - user01
[user01@localhost ~]$ ls
file
[user01@localhost ~]$ cat file
The file is created by server1-user01
[user01@localhost ~]$ pwd
/data/user01

# 检查server2中挂载情况
[user01@localhost ~]$ df -h
df: /mnt/nfs/share: Stale file handle
Filesystem                  Size  Used Avail Use% Mounted on
devtmpfs                    4.0M     0  4.0M   0% /dev
tmpfs                       872M     0  872M   0% /dev/shm
tmpfs                       349M  6.6M  343M   2% /run
/dev/mapper/rl-root          17G  1.7G   16G  10% /
/dev/nvme0n1p1              960M  261M  700M  28% /boot
tmpfs                       175M     0  175M   0% /run/user/0
192.168.88.10:/data/user01   17G  1.7G   16G  10% /data/user01
五、总结
从该实验结果中可以看出,我们通过nfs和autofs工具的配合使用,实现了两台主机共享同一个目录的效果。
NFS工具主要目的在于将远程存储设备共享出来,其他主机能够将分享出来的目录进行挂载。达到跟使用自己本地硬盘一样的效果。有效的解决了本地硬盘空间不足,部分文件需要共享,数据存储持久化等问题。是目前企业里使用较多的文件共享服务器最佳实践方案。
