# NFS网络文件共享
NFS(Network File System)是一种分布式文件系统协议,最初由Sun Microsystems在1984年开发。NFS允许计算机在网络上共享文件和目录,就像这些文件和目录位于本地计算机上一样。它广泛应用于UNIX和类UNIX系统中,但也可以在其他操作系统上使用,如Windows和macOS。
## NFS简介与RPC简介
### NFS服务介绍
NFS是一种网络协议,NFS依赖RPC才能工作。
NFS 的基本原则是“容许不同的客户端及服务端通过一组RPC分享相同的文件系统”,它是独立于操作系统,容许不同硬件及操作系统的系统共同进行文件的分享。可以理解为把一个电脑上的硬盘挂载到另一个电脑上使用,另一个电脑能够像使用自己本地硬盘使用挂载的硬盘。
NFS在文件传送或信息传送过程中依赖于RPC协议。RPC,远程过程调用 (Remote Procedure Call) 是能使客户端执行其他系统中程序的一种机制。NFS本身是没有提供信息传输的协议和功能的,但NFS却能让我们通过网络进行资料的分享,这是因为NFS使用了一些其它的传输协议。而这些传输协议用到这个RPC功能的。可以这么理解RPC和NFS的关系:NFS是一个文件系统,而RPC是负责信息的传输。
### RPC协议介绍
RPC(Remote Procedure Call)远程过程调用,它是一种通过网络从远程计算机程序上请求服务,而不需要了解底层网络技术的协议。其工作在TCP/UDP的111端口。建立在Socket之上的,主要是简化编程的工作在底层提供网络之间的通信。
RPC采用客户机/服务器模式。请求程序就是一个客户机,而服务提供程序就是一个服务器。首先,客户机调用进程发送一个有进程参数的调用信息到服务进程,然后等待应答信息。在服务器端,进程保持睡眠状态直到调用信息的到达为止。当一个调用信息到达,服务器获得进程参数,计算结果,发送答复信息,然后等待下一个调用信息,最后,客户端调用进程接收答复信息,获得进程结果,然后调用执行继续进行。
#### RPC 远程过程调度
* NFS 协议本身并没有网络传输功能,而是基于远程过程调用协议实现的
* 提供一个面向过程的远程服务的接口
* 可以通过网络从远程主机程序上请求服务,而不需要了解底层网络技术的协议
* 工作在 OSI 模型的会话层,它可以为遵从 RPC 协议应用层协议提供端口注册功能
* 事实上,有很多服务(NFS 和 NIS 等)都可以向 RPC 注册端口
* RPC 使用网络端口 111 来监听客户端的请求
#### RPC 协议模型
1. 基于 rpc 的服务(此处是指 nfs 服务,在别处有可能是代表其他服务)在启动时向 portmapper 注册端口
2. 基于 rpc 的客户端联系服务端 portmapper 询问服务的端口号
3. portmapper 告知客户端基于 rpc 服务使用的端口号
4. 基于 rpc 的客户端访问被告知单某基于 rpc 服务的端口
5. 基于 rpc 的服务响应客户端的请求
### NFS工作流程
1. 首先服务器端启动RPC服务,并开启111端口
2. 然后还需要服务器端启动NFS服务,并向RPC注册端口信息
3. 客户端启动RPC(portmap服务),向服务端的RPC(portmap)服务请求服务端的NFS端口
4. 服务端的RPC(portmap)服务反馈NFS端口信息给客户端。
5. 客户端通过获取的NFS端口来建立和服务端的NFS连接并进行数据的传输。
 ### 挂载原理/过程
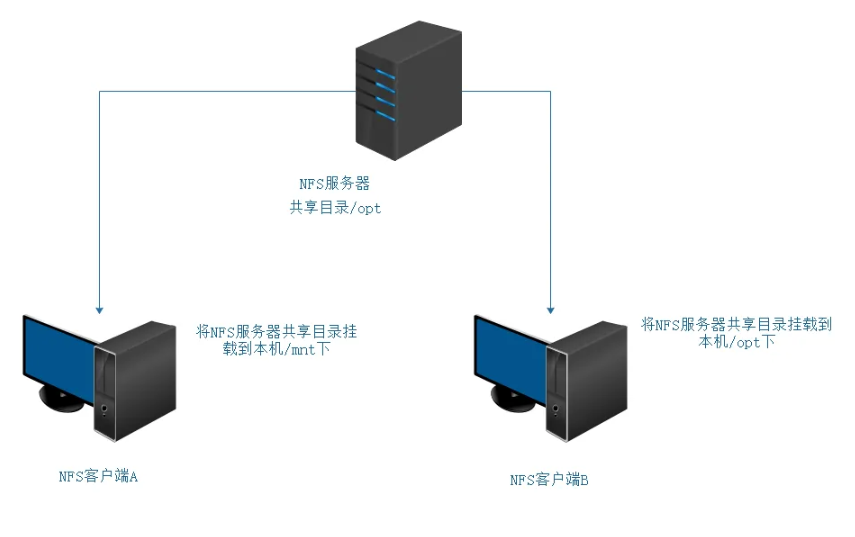
当我们在NFS服务器设置好一个共享目录/opt 后,其他人是有权访问/opt这个共享目录的,NFS客户端就可以将这个目录挂载到自己文件系统的某个挂载点(这个挂载点可以自己定义),路径不同也可以;如下图客户端A与客户端B挂载的目录就不相同。并且挂载好后我们在本地能够看到服务端/opt下的所有数据。
### 挂载原理/过程
当我们在NFS服务器设置好一个共享目录/opt 后,其他人是有权访问/opt这个共享目录的,NFS客户端就可以将这个目录挂载到自己文件系统的某个挂载点(这个挂载点可以自己定义),路径不同也可以;如下图客户端A与客户端B挂载的目录就不相同。并且挂载好后我们在本地能够看到服务端/opt下的所有数据。
 # NFS共享实战
## 准备工作
一、服务器信息:
```bash
主机 IP 服务 端口
服务端: 192.168.88.10 nfs rpc 2049 111
客户端: 192.168.88.20 nfs rpc 2049 111
```
二、关闭防火墙
```bash
# 关闭防火墙
systemctl stop firewalld
# 禁止防火墙开机自启
systemctl disable firewalld
```
如果必须开启防火墙,我们可以通过firewalld放行nfs和rpc服务
```bash
# 开启nfs和rpc服务
firewall-cmd --permanent --add-service=nfs
firewall-cmd --permanent --add-service=rpc-bind
# 重载防火墙规则
firewall-cmd --reload
```
三、关闭SELinux
```bash
setenforce 0
```
四、检查内核是否支持
```bash
modinfo nfs
```
## NFS软件介绍
相关软件包:nfs-utils、rpcbind
端口:2049(nfsd),其它端口由 portmap(111)分配。CentOS 6 开始 portmap 进程由 rpcbind 代替
NFS 服务主要进程:
* rpc.nfsd 最主要的 NFS 进程, 管理客户端是否可登录
* rpc.mountd 挂载和卸载 NFS 文件系统,包括权限管理
* rpc.lockd 非必要,管理文件锁,避免同时写出错
* rpc.statd 非必要, 检查文件-致性, 可修复文件
* 日志:/var/lib/nfs
配置文件:
* /etc/exports
* /etc/exports.d/*.exports
## NFS部署
一、安装rpcbind和nfs服务
```bash
[root@localhost ~]# yum -y install rpcbind nfs-utils
```
二、启动服务
```bash
[root@localhost ~]# systemctl enable --now rpcbind
[root@localhost ~]# systemctl enable --now nfs-server
Created symlink /etc/systemd/system/multi-user.target.wants/nfs-server.service → /usr/lib/systemd/system/nfs-server.service.
```
三、验证服务
```bash
[root@localhost ~]# systemctl status rpcbind
● rpcbind.service - RPC Bind
Loaded: loaded (/usr/lib/systemd/system/rpcbind.service; enabled; preset: enabled)
Active: active (running) since Thu 2025-01-09 10:54:21 CST; 51s ago
TriggeredBy: ● rpcbind.socket
Docs: man:rpcbind(8)
Main PID: 26847 (rpcbind)
Tasks: 1 (limit: 10888)
Memory: 1.6M
CPU: 28ms
CGroup: /system.slice/rpcbind.service
└─26847 /usr/bin/rpcbind -w -f
Jan 09 10:54:21 localhost.localdomain systemd[1]: Starting RPC Bind...
Jan 09 10:54:21 localhost.localdomain systemd[1]: Started RPC Bind.
[root@localhost ~]# systemctl status nfs-server
● nfs-server.service - NFS server and services
Loaded: loaded (/usr/lib/systemd/system/nfs-server.service; enabled; preset: disabled)
Active: active (exited) since Thu 2025-01-09 10:54:39 CST; 42s ago
Docs: man:rpc.nfsd(8)
man:exportfs(8)
Process: 27817 ExecStartPre=/usr/sbin/exportfs -r (code=exited, status=0/SUCCESS)
Process: 27818 ExecStart=/usr/sbin/rpc.nfsd (code=exited, status=0/SUCCESS)
Process: 27836 ExecStart=/bin/sh -c if systemctl -q is-active gssproxy; then systemctl reload gssproxy ; fi (code=exited, st>
Main PID: 27836 (code=exited, status=0/SUCCESS)
CPU: 35ms
Jan 09 10:54:38 localhost.localdomain systemd[1]: Starting NFS server and services...
Jan 09 10:54:39 localhost.localdomain systemd[1]: Finished NFS server and services.
# 端口号验证
[root@localhost ~]# ss -nlt
State Recv-Q Send-Q Local Address:Port Peer Address:Port Process
LISTEN 0 64 0.0.0.0:2049 0.0.0.0:*
LISTEN 0 128 0.0.0.0:22 0.0.0.0:*
LISTEN 0 4096 0.0.0.0:111 0.0.0.0:*
LISTEN 0 4096 0.0.0.0:56973 0.0.0.0:*
LISTEN 0 64 0.0.0.0:46725 0.0.0.0:*
LISTEN 0 4096 0.0.0.0:20048 0.0.0.0:*
LISTEN 0 64 [::]:2049 [::]:*
LISTEN 0 128 [::]:22 [::]:*
LISTEN 0 4096 [::]:111 [::]:*
LISTEN 0 64 [::]:35931 [::]:*
LISTEN 0 4096 [::]:35405 [::]:*
LISTEN 0 4096 [::]:20048 [::]:*
```
### NFS配置文件格式
```shell
/dir 主机 1(opt1,opt2) 主机 2(opt1,opt2)
```
* 主机格式
* 单个主机: ipv4, ipv6, FQDN
* IP networks: 两种掩码格式均支持
* 172.18.0.0/255.255.0.0
* 172.18.0.0/16
* wildcards:主机名通配,例如*.iproute.cn,IP 不可以
* netgroups: NIS 域的主机组,@group_ name
* anonymous:表示使用*通配所有客户端
* 选项格式
* 默认选项
* (ro,sync,root_squash, no_all_squash)
* ro, rw
* 只读和读写
* async
* 异步,数据变化后不立即写磁盘,等磁盘空闲时再写入,性能高
* sync
* 同步(1.0.0 后为默认),数据在请求时立即写入共享存储磁盘
* root_squash
* 远程 root 映射为 nfsnobody(默认),UID 为 65534,Centos8 为 nobody, 早期版本是 4294967294 (nfsnobody)
* no_root_squash
* 远程 root 映射成 root 用户
* all_squash
* 所有远程用户(包括 root)都变成 nfsnobody , Centos8 为 nobody
* no_all_squash
* 保留共享文件的 UID 和 GID (默认)
* anonuid 和 anongid
* 指明匿名用户映射为特定用户 UID 和组 GID,而非 nfsnobody ,可配合 all_squash 使用
### NFS相关工具
#### rpcinfo
rpcinfo 工具可以查看 RPC 相关信息
查看注册在指定主机的 RPC 程序
```shell
rpcinfo -p hostname
```
查看 rpc 注册程序
```shell
rpcinfo -s hostname
```
#### exportfs
可用于管理 NFS 导出的文件系统
常见选项:
* **-v**:查看本机所有 NFS 共享
* **-r**:重读配置文件,并共享目录
* **-a**:输出本机所有共享
* **-au**:停止本机所有共享
#### showmount
常见用法:
```shell
showmount -e hostname
```
### 配置共享目录
服务端上创建共享目录;这里我们要挂载的目录是`/myshare`
```bash
[root@localhost ~]# mkdir -p /myshare
```
### 手动挂载案例
```bash
# 服务端
[root@localhost ~]# vim /etc/exports
/myshare 192.168.88.0/24
[root@localhost ~]# cd /myshare
[root@localhost myshare]# echo "hello" > file
[root@localhost ~]# systemctl stop firewalld
[root@localhost ~]# setenforce 0
# 客户端:
[root@localhost ~]# yum install -y nfs-utils rpcbind
[root@localhost ~]# showmount -e 192.168.88.10
Export list for 192.168.88.10:
# 虽然我们自己配置共享了,但是没有重读配置文件,所以读不到
# 服务端:
[root@localhost myshare]# exportfs -r
exportfs: No options for /myshare 192.168.88.0/24: suggest 192.168.88.0/24(sync) to avoid warning
[root@localhost myshare]# exportfs -v
/myshare 192.168.88.0/24(sync,wdelay,hide,no_subtree_check,sec=sys,ro,secure,root_squash,no_all_squash)
# 客户端:
[root@localhost ~]# showmount -e 192.168.88.10
Export list for 192.168.88.10:
/myshare 192.168.88.0/24
[root@localhost ~]# mkdir /mnt/nfs
[root@localhost ~]# mount -t nfs 192.168.88.10:/myshare /mnt/nfs
[root@localhost ~]# df -h
Filesystem Size Used Avail Use% Mounted on
devtmpfs 4.0M 0 4.0M 0% /dev
tmpfs 872M 0 872M 0% /dev/shm
tmpfs 349M 5.2M 344M 2% /run
/dev/mapper/rl-root 17G 1.7G 16G 10% /
/dev/nvme0n1p1 960M 261M 700M 28% /boot
tmpfs 175M 0 175M 0% /run/user/0
192.168.88.10:/myshare 17G 1.7G 16G 10% /mnt/nfs
[root@localhost ~]# cd /mnt/nfs/
[root@localhost nfs]# ls
file
[root@localhost nfs]# cat file
hello
[root@localhost ~]# rm -f file
rm: cannot remove 'file': Read-only file system
[root@localhost ~]# umount /mnt/nfs
# 现在是只读模式,想要修改模式要去改配置文件,先卸载挂载
# 服务端:
[root@localhost ~]# vim /etc/exports
/myshare 192.168.88.0/24(rw,sync,root_squash,no_all_squash)
[root@localhost myshare]# exportfs -v
/myshare 192.168.88.0/24(sync,wdelay,hide,no_subtree_check,sec=sys,ro,secure,root_squash,no_all_squash)
[root@localhost myshare]# exportfs -r
[root@localhost myshare]# exportfs -v
/myshare 192.168.88.0/24(sync,wdelay,hide,no_subtree_check,sec=sys,rw,secure,root_squash,no_all_squash)
# 客户端:
[root@localhost ~]# showmount -e 192.168.88.10
Export list for 192.168.88.10:
/myshare 192.168.88.0/24
[root@localhost ~]# mount -t nfs 192.168.88.10:/myshare /mnt/nfs
[root@localhost ~]# df -h
Filesystem Size Used Avail Use% Mounted on
devtmpfs 4.0M 0 4.0M 0% /dev
tmpfs 872M 0 872M 0% /dev/shm
tmpfs 349M 5.2M 344M 2% /run
/dev/mapper/rl-root 17G 1.7G 16G 10% /
/dev/nvme0n1p1 960M 261M 700M 28% /boot
tmpfs 175M 0 175M 0% /run/user/0
192.168.88.10:/myshare 17G 1.7G 16G 10% /mnt/nfs
[root@localhost ~]# cd /mnt/nfs/
[root@localhost nfs]# rm -f file
rm: cannot remove 'file': Permission denied
# 虽然给了rw权限,但是目录权限被linux控制
# 服务端:
[root@localhost myshare]# ll -d /myshare/
drwxr-xr-x. 2 root root 18 Jan 9 15:59 /myshare/
[root@localhost myshare]# chmod a+w /myshare/
# 客户端:
[root@localhost nfs]# rm -f file
[root@localhost nfs]# echo "Hello, This is server2" > file
[root@localhost nfs]# ll
total 4
-rw-r--r--. 1 nobody nobody 23 Jan 9 16:14 file
[root@localhost nfs]# su - user01
[user01@localhost ~]$ cd /mnt/nfs/
[user01@localhost nfs]$ touch file1
[user01@localhost nfs]$ ll
总用量 4
-rw-r--r-- 1 nfsnobody nfsnobody 6 7月 16 22:08 file
-rw-rw-r-- 1 user01 user01 0 7月 16 22:11 file1
# 服务端:
[root@localhost myshare]# ll
总用量 4
-rw-r--r--. 1 nfsnobody nfsnobody 6 7月 16 22:08 file
-rw-rw-r--. 1 1000 1000 0 7月 16 22:11 file1
[root@localhost myshare]# useradd -u1000 zhangsan
[root@localhost myshare]# ll
总用量 4
-rw-r--r--. 1 nfsnobody nfsnobody 6 7月 16 22:08 file
-rw-rw-r--. 1 zhangsan zhangsan 0 7月 16 22:11 file1
[root@localhost ~]# vim /etc/exports
/myshare 192.168.88.0/24(rw,sync,no_root_squash,all_squash)
[root@localhost myshare]# exportfs -r
[root@localhost myshare]# exportfs -v
/myshare 192.168.88.0/24(sync,wdelay,hide,no_subtree_check,sec=sys,rw,secure,no_root_squash,all_squash)
# 客户端:
[root@localhost ~]# umount /mnt/nfs/
[root@localhost ~]# mount -t nfs 192.168.88.10:/myshare /mnt/nfs
[root@localhost ~]# df -h
[root@localhost ~]# cd /mnt/nfs/
[root@localhost ~]# touch file{2,3}
[root@localhost nfs]# ll
总用量 4
-rw-r--r-- 1 nfsnobody nfsnobody 6 7月 16 22:08 file
-rw-rw-r-- 1 user01 user01 0 7月 16 22:11 file1
-rw-r--r-- 1 nfsnobody nfsnobody 0 7月 16 22:26 file2
-rw-r--r-- 1 nfsnobody nfsnobody 0 7月 16 22:26 file3
```
## mount.nfs挂载选项
客户端 NFS 挂载
NFS 相关的挂载选项:`man 5 nfs`
* **fg**:(默认)前台挂载,失败直接退出
* **bg**:后台挂载,失败后会再次尝试
* **hard**:(默认)持续请求
* **soft**:非持续请求
* **intr 和 hard 配合**:请求可中断
* **rsize 和 wsize**:一次读和写数据最大字节数,rsize=32768
* **nosuid**:忽略文件的suid特殊权限
* **_netdev**:提示标志,表示挂载的是网络设备,启动时候先简历网络连接,再挂载设备
* **noexec**:表示不允许执行
提示:基于安全考虑,建议使用`nosuid,_netdev,noexec`挂载选项
范例:临时挂载 NFS 共享
```shell
mount -o rw,nosuid,fg,hard,intr 192.168.88.10:/myshare /mnt/nfs
```
范例:开机挂载
```shell
vim /etc/fstab
192.168.88.10:/myshare /mnt/nfs nfs defaults,_netdev 0 0
```
# 自动挂载
由于NFS的应用场景,需要我们挂载远程硬盘本地使用,所以我们可以使用autofs服务按需要挂载外围设备,NFS共享等,并在空闲5分钟后后自动卸载。
主要用于客户端上,在客户端上自动挂载服务端提供的共享目录。
## 相关包和文件
* 软件包: autofs
* 服务文件: /usr/lib/systemd/system/autofs.service
* 配置文件: /etc/auto.master
客户端安装:
```bash
[root@localhost ~]# yum install -y autofs
[root@localhost ~]# systemctl enable --now autofs
```
## 配置autofs
`autofs` 的主要配置分为 **主配置文件** 和 **挂载映射文件**。
### **主配置文件 **
`/etc/auto.master` 是 `autofs` 的主配置文件,用于定义挂载点及其对应的映射文件。
示例:
```bash
/mnt/nfs /etc/auto.nfs --timeout=300
```
配置说明:
- `/mnt/nfs`:挂载点的根目录。
- `/etc/auto.nfs`:挂载点对应的映射文件。
- `--timeout=300`:挂载超时时间(单位为秒),300 秒后未访问的挂载点将自动卸载。
**注意**:修改 `/etc/auto.master` 后需要重新加载 `autofs` 服务。
```bash
systemctl reload autofs
```
### 挂载映射文件 `/etc/auto.nfs`
挂载映射文件定义了具体的 NFS 挂载规则。
示例:
```bash
share1 -fstype=nfs4,rw,soft nfs-server:/export/share1
share2 -fstype=nfs4,ro,hard nfs-server:/export/share2
```
#### 配置说明:
- `share1` 和 `share2`:挂载点名称,最终挂载路径为 `/mnt/nfs/share1` 和 `/mnt/nfs/share2`。
- `-fstype=nfs4`: 指定文件系统类型为 NFSv4。
- `rw`/`ro`:挂载权限,`rw` 表示读写,`ro` 表示只读。
- soft/hard:
- **soft**:如果 NFS 服务器未响应,客户端将返回错误。
- **hard**:客户端将无限期尝试连接,直到服务器恢复正常。
- `nfs-server:/export/share1`:NFS 服务器地址及其共享路径。
**注意**:修改挂载映射文件后无需重启服务,`autofs` 会动态加载。
## 挂载案例
一、创建挂载点目录
```bash
[root@localhost ~]# mkdir /mnt/nfs
```
二、配置autofs自动挂载
```bash
# 编辑auto.master主配置文件
[root@localhost ~]# vim /etc/auto.master
/mnt/nfs /etc/auto.nfs
[root@localhost ~]# systemctl restart autofs
# 编辑挂载映射文件
[root@localhost ~]# vim /etc/auto.nfs
share -fstype=nfs4,rw,soft 192.168.88.10:/myshare
```
三、验证挂载
```bash
# 访问挂载点以触发自动挂载
[root@localhost ~]# ls /mnt/nfs/share
dir file file1
[root@localhost ~]# cd /mnt/nfs/share/
[root@localhost share]# ls
dir file file1
[root@localhost share]# cat file
Hello, This is server2
```
### 其他配置选项
在挂载映射文件中可以使用多种选项,以下是常用参数的详细说明:
#### 文件系统类型选项 (`-fstype=`)
- **nfs**:适用于 NFSv3 文件系统。
- **nfs4**:适用于 NFSv4 文件系统。
#### 挂载选项
- **rw**:读写权限。
- **ro**:只读权限。
- **soft**:允许客户端在超时后返回错误。
- **hard**:客户端会一直尝试连接,直到服务器恢复正常。
- **intr**:允许中断挂载操作(NFSv3 使用)。
- **timeo=**:超时时间(默认 600 分钟)。
- **bg**:后台挂载操作。
### 变量支持
映射文件中可以使用变量。例如:
```bash
* -fstype=nfs4,rw 192.168.88.10:/myshare/&
```
在此配置中,`*` 代表通配符,`&` 将被替换为对应挂载点名称。例如,访问 `/mnt/nfs/test` 时将挂载 `192.168.88.10:/myshare/test`
# 实战案例
将NFS的共享目录,通过autofs 发布出来,做为远程主机用户的家目录
# NFS共享实战
## 准备工作
一、服务器信息:
```bash
主机 IP 服务 端口
服务端: 192.168.88.10 nfs rpc 2049 111
客户端: 192.168.88.20 nfs rpc 2049 111
```
二、关闭防火墙
```bash
# 关闭防火墙
systemctl stop firewalld
# 禁止防火墙开机自启
systemctl disable firewalld
```
如果必须开启防火墙,我们可以通过firewalld放行nfs和rpc服务
```bash
# 开启nfs和rpc服务
firewall-cmd --permanent --add-service=nfs
firewall-cmd --permanent --add-service=rpc-bind
# 重载防火墙规则
firewall-cmd --reload
```
三、关闭SELinux
```bash
setenforce 0
```
四、检查内核是否支持
```bash
modinfo nfs
```
## NFS软件介绍
相关软件包:nfs-utils、rpcbind
端口:2049(nfsd),其它端口由 portmap(111)分配。CentOS 6 开始 portmap 进程由 rpcbind 代替
NFS 服务主要进程:
* rpc.nfsd 最主要的 NFS 进程, 管理客户端是否可登录
* rpc.mountd 挂载和卸载 NFS 文件系统,包括权限管理
* rpc.lockd 非必要,管理文件锁,避免同时写出错
* rpc.statd 非必要, 检查文件-致性, 可修复文件
* 日志:/var/lib/nfs
配置文件:
* /etc/exports
* /etc/exports.d/*.exports
## NFS部署
一、安装rpcbind和nfs服务
```bash
[root@localhost ~]# yum -y install rpcbind nfs-utils
```
二、启动服务
```bash
[root@localhost ~]# systemctl enable --now rpcbind
[root@localhost ~]# systemctl enable --now nfs-server
Created symlink /etc/systemd/system/multi-user.target.wants/nfs-server.service → /usr/lib/systemd/system/nfs-server.service.
```
三、验证服务
```bash
[root@localhost ~]# systemctl status rpcbind
● rpcbind.service - RPC Bind
Loaded: loaded (/usr/lib/systemd/system/rpcbind.service; enabled; preset: enabled)
Active: active (running) since Thu 2025-01-09 10:54:21 CST; 51s ago
TriggeredBy: ● rpcbind.socket
Docs: man:rpcbind(8)
Main PID: 26847 (rpcbind)
Tasks: 1 (limit: 10888)
Memory: 1.6M
CPU: 28ms
CGroup: /system.slice/rpcbind.service
└─26847 /usr/bin/rpcbind -w -f
Jan 09 10:54:21 localhost.localdomain systemd[1]: Starting RPC Bind...
Jan 09 10:54:21 localhost.localdomain systemd[1]: Started RPC Bind.
[root@localhost ~]# systemctl status nfs-server
● nfs-server.service - NFS server and services
Loaded: loaded (/usr/lib/systemd/system/nfs-server.service; enabled; preset: disabled)
Active: active (exited) since Thu 2025-01-09 10:54:39 CST; 42s ago
Docs: man:rpc.nfsd(8)
man:exportfs(8)
Process: 27817 ExecStartPre=/usr/sbin/exportfs -r (code=exited, status=0/SUCCESS)
Process: 27818 ExecStart=/usr/sbin/rpc.nfsd (code=exited, status=0/SUCCESS)
Process: 27836 ExecStart=/bin/sh -c if systemctl -q is-active gssproxy; then systemctl reload gssproxy ; fi (code=exited, st>
Main PID: 27836 (code=exited, status=0/SUCCESS)
CPU: 35ms
Jan 09 10:54:38 localhost.localdomain systemd[1]: Starting NFS server and services...
Jan 09 10:54:39 localhost.localdomain systemd[1]: Finished NFS server and services.
# 端口号验证
[root@localhost ~]# ss -nlt
State Recv-Q Send-Q Local Address:Port Peer Address:Port Process
LISTEN 0 64 0.0.0.0:2049 0.0.0.0:*
LISTEN 0 128 0.0.0.0:22 0.0.0.0:*
LISTEN 0 4096 0.0.0.0:111 0.0.0.0:*
LISTEN 0 4096 0.0.0.0:56973 0.0.0.0:*
LISTEN 0 64 0.0.0.0:46725 0.0.0.0:*
LISTEN 0 4096 0.0.0.0:20048 0.0.0.0:*
LISTEN 0 64 [::]:2049 [::]:*
LISTEN 0 128 [::]:22 [::]:*
LISTEN 0 4096 [::]:111 [::]:*
LISTEN 0 64 [::]:35931 [::]:*
LISTEN 0 4096 [::]:35405 [::]:*
LISTEN 0 4096 [::]:20048 [::]:*
```
### NFS配置文件格式
```shell
/dir 主机 1(opt1,opt2) 主机 2(opt1,opt2)
```
* 主机格式
* 单个主机: ipv4, ipv6, FQDN
* IP networks: 两种掩码格式均支持
* 172.18.0.0/255.255.0.0
* 172.18.0.0/16
* wildcards:主机名通配,例如*.iproute.cn,IP 不可以
* netgroups: NIS 域的主机组,@group_ name
* anonymous:表示使用*通配所有客户端
* 选项格式
* 默认选项
* (ro,sync,root_squash, no_all_squash)
* ro, rw
* 只读和读写
* async
* 异步,数据变化后不立即写磁盘,等磁盘空闲时再写入,性能高
* sync
* 同步(1.0.0 后为默认),数据在请求时立即写入共享存储磁盘
* root_squash
* 远程 root 映射为 nfsnobody(默认),UID 为 65534,Centos8 为 nobody, 早期版本是 4294967294 (nfsnobody)
* no_root_squash
* 远程 root 映射成 root 用户
* all_squash
* 所有远程用户(包括 root)都变成 nfsnobody , Centos8 为 nobody
* no_all_squash
* 保留共享文件的 UID 和 GID (默认)
* anonuid 和 anongid
* 指明匿名用户映射为特定用户 UID 和组 GID,而非 nfsnobody ,可配合 all_squash 使用
### NFS相关工具
#### rpcinfo
rpcinfo 工具可以查看 RPC 相关信息
查看注册在指定主机的 RPC 程序
```shell
rpcinfo -p hostname
```
查看 rpc 注册程序
```shell
rpcinfo -s hostname
```
#### exportfs
可用于管理 NFS 导出的文件系统
常见选项:
* **-v**:查看本机所有 NFS 共享
* **-r**:重读配置文件,并共享目录
* **-a**:输出本机所有共享
* **-au**:停止本机所有共享
#### showmount
常见用法:
```shell
showmount -e hostname
```
### 配置共享目录
服务端上创建共享目录;这里我们要挂载的目录是`/myshare`
```bash
[root@localhost ~]# mkdir -p /myshare
```
### 手动挂载案例
```bash
# 服务端
[root@localhost ~]# vim /etc/exports
/myshare 192.168.88.0/24
[root@localhost ~]# cd /myshare
[root@localhost myshare]# echo "hello" > file
[root@localhost ~]# systemctl stop firewalld
[root@localhost ~]# setenforce 0
# 客户端:
[root@localhost ~]# yum install -y nfs-utils rpcbind
[root@localhost ~]# showmount -e 192.168.88.10
Export list for 192.168.88.10:
# 虽然我们自己配置共享了,但是没有重读配置文件,所以读不到
# 服务端:
[root@localhost myshare]# exportfs -r
exportfs: No options for /myshare 192.168.88.0/24: suggest 192.168.88.0/24(sync) to avoid warning
[root@localhost myshare]# exportfs -v
/myshare 192.168.88.0/24(sync,wdelay,hide,no_subtree_check,sec=sys,ro,secure,root_squash,no_all_squash)
# 客户端:
[root@localhost ~]# showmount -e 192.168.88.10
Export list for 192.168.88.10:
/myshare 192.168.88.0/24
[root@localhost ~]# mkdir /mnt/nfs
[root@localhost ~]# mount -t nfs 192.168.88.10:/myshare /mnt/nfs
[root@localhost ~]# df -h
Filesystem Size Used Avail Use% Mounted on
devtmpfs 4.0M 0 4.0M 0% /dev
tmpfs 872M 0 872M 0% /dev/shm
tmpfs 349M 5.2M 344M 2% /run
/dev/mapper/rl-root 17G 1.7G 16G 10% /
/dev/nvme0n1p1 960M 261M 700M 28% /boot
tmpfs 175M 0 175M 0% /run/user/0
192.168.88.10:/myshare 17G 1.7G 16G 10% /mnt/nfs
[root@localhost ~]# cd /mnt/nfs/
[root@localhost nfs]# ls
file
[root@localhost nfs]# cat file
hello
[root@localhost ~]# rm -f file
rm: cannot remove 'file': Read-only file system
[root@localhost ~]# umount /mnt/nfs
# 现在是只读模式,想要修改模式要去改配置文件,先卸载挂载
# 服务端:
[root@localhost ~]# vim /etc/exports
/myshare 192.168.88.0/24(rw,sync,root_squash,no_all_squash)
[root@localhost myshare]# exportfs -v
/myshare 192.168.88.0/24(sync,wdelay,hide,no_subtree_check,sec=sys,ro,secure,root_squash,no_all_squash)
[root@localhost myshare]# exportfs -r
[root@localhost myshare]# exportfs -v
/myshare 192.168.88.0/24(sync,wdelay,hide,no_subtree_check,sec=sys,rw,secure,root_squash,no_all_squash)
# 客户端:
[root@localhost ~]# showmount -e 192.168.88.10
Export list for 192.168.88.10:
/myshare 192.168.88.0/24
[root@localhost ~]# mount -t nfs 192.168.88.10:/myshare /mnt/nfs
[root@localhost ~]# df -h
Filesystem Size Used Avail Use% Mounted on
devtmpfs 4.0M 0 4.0M 0% /dev
tmpfs 872M 0 872M 0% /dev/shm
tmpfs 349M 5.2M 344M 2% /run
/dev/mapper/rl-root 17G 1.7G 16G 10% /
/dev/nvme0n1p1 960M 261M 700M 28% /boot
tmpfs 175M 0 175M 0% /run/user/0
192.168.88.10:/myshare 17G 1.7G 16G 10% /mnt/nfs
[root@localhost ~]# cd /mnt/nfs/
[root@localhost nfs]# rm -f file
rm: cannot remove 'file': Permission denied
# 虽然给了rw权限,但是目录权限被linux控制
# 服务端:
[root@localhost myshare]# ll -d /myshare/
drwxr-xr-x. 2 root root 18 Jan 9 15:59 /myshare/
[root@localhost myshare]# chmod a+w /myshare/
# 客户端:
[root@localhost nfs]# rm -f file
[root@localhost nfs]# echo "Hello, This is server2" > file
[root@localhost nfs]# ll
total 4
-rw-r--r--. 1 nobody nobody 23 Jan 9 16:14 file
[root@localhost nfs]# su - user01
[user01@localhost ~]$ cd /mnt/nfs/
[user01@localhost nfs]$ touch file1
[user01@localhost nfs]$ ll
总用量 4
-rw-r--r-- 1 nfsnobody nfsnobody 6 7月 16 22:08 file
-rw-rw-r-- 1 user01 user01 0 7月 16 22:11 file1
# 服务端:
[root@localhost myshare]# ll
总用量 4
-rw-r--r--. 1 nfsnobody nfsnobody 6 7月 16 22:08 file
-rw-rw-r--. 1 1000 1000 0 7月 16 22:11 file1
[root@localhost myshare]# useradd -u1000 zhangsan
[root@localhost myshare]# ll
总用量 4
-rw-r--r--. 1 nfsnobody nfsnobody 6 7月 16 22:08 file
-rw-rw-r--. 1 zhangsan zhangsan 0 7月 16 22:11 file1
[root@localhost ~]# vim /etc/exports
/myshare 192.168.88.0/24(rw,sync,no_root_squash,all_squash)
[root@localhost myshare]# exportfs -r
[root@localhost myshare]# exportfs -v
/myshare 192.168.88.0/24(sync,wdelay,hide,no_subtree_check,sec=sys,rw,secure,no_root_squash,all_squash)
# 客户端:
[root@localhost ~]# umount /mnt/nfs/
[root@localhost ~]# mount -t nfs 192.168.88.10:/myshare /mnt/nfs
[root@localhost ~]# df -h
[root@localhost ~]# cd /mnt/nfs/
[root@localhost ~]# touch file{2,3}
[root@localhost nfs]# ll
总用量 4
-rw-r--r-- 1 nfsnobody nfsnobody 6 7月 16 22:08 file
-rw-rw-r-- 1 user01 user01 0 7月 16 22:11 file1
-rw-r--r-- 1 nfsnobody nfsnobody 0 7月 16 22:26 file2
-rw-r--r-- 1 nfsnobody nfsnobody 0 7月 16 22:26 file3
```
## mount.nfs挂载选项
客户端 NFS 挂载
NFS 相关的挂载选项:`man 5 nfs`
* **fg**:(默认)前台挂载,失败直接退出
* **bg**:后台挂载,失败后会再次尝试
* **hard**:(默认)持续请求
* **soft**:非持续请求
* **intr 和 hard 配合**:请求可中断
* **rsize 和 wsize**:一次读和写数据最大字节数,rsize=32768
* **nosuid**:忽略文件的suid特殊权限
* **_netdev**:提示标志,表示挂载的是网络设备,启动时候先简历网络连接,再挂载设备
* **noexec**:表示不允许执行
提示:基于安全考虑,建议使用`nosuid,_netdev,noexec`挂载选项
范例:临时挂载 NFS 共享
```shell
mount -o rw,nosuid,fg,hard,intr 192.168.88.10:/myshare /mnt/nfs
```
范例:开机挂载
```shell
vim /etc/fstab
192.168.88.10:/myshare /mnt/nfs nfs defaults,_netdev 0 0
```
# 自动挂载
由于NFS的应用场景,需要我们挂载远程硬盘本地使用,所以我们可以使用autofs服务按需要挂载外围设备,NFS共享等,并在空闲5分钟后后自动卸载。
主要用于客户端上,在客户端上自动挂载服务端提供的共享目录。
## 相关包和文件
* 软件包: autofs
* 服务文件: /usr/lib/systemd/system/autofs.service
* 配置文件: /etc/auto.master
客户端安装:
```bash
[root@localhost ~]# yum install -y autofs
[root@localhost ~]# systemctl enable --now autofs
```
## 配置autofs
`autofs` 的主要配置分为 **主配置文件** 和 **挂载映射文件**。
### **主配置文件 **
`/etc/auto.master` 是 `autofs` 的主配置文件,用于定义挂载点及其对应的映射文件。
示例:
```bash
/mnt/nfs /etc/auto.nfs --timeout=300
```
配置说明:
- `/mnt/nfs`:挂载点的根目录。
- `/etc/auto.nfs`:挂载点对应的映射文件。
- `--timeout=300`:挂载超时时间(单位为秒),300 秒后未访问的挂载点将自动卸载。
**注意**:修改 `/etc/auto.master` 后需要重新加载 `autofs` 服务。
```bash
systemctl reload autofs
```
### 挂载映射文件 `/etc/auto.nfs`
挂载映射文件定义了具体的 NFS 挂载规则。
示例:
```bash
share1 -fstype=nfs4,rw,soft nfs-server:/export/share1
share2 -fstype=nfs4,ro,hard nfs-server:/export/share2
```
#### 配置说明:
- `share1` 和 `share2`:挂载点名称,最终挂载路径为 `/mnt/nfs/share1` 和 `/mnt/nfs/share2`。
- `-fstype=nfs4`: 指定文件系统类型为 NFSv4。
- `rw`/`ro`:挂载权限,`rw` 表示读写,`ro` 表示只读。
- soft/hard:
- **soft**:如果 NFS 服务器未响应,客户端将返回错误。
- **hard**:客户端将无限期尝试连接,直到服务器恢复正常。
- `nfs-server:/export/share1`:NFS 服务器地址及其共享路径。
**注意**:修改挂载映射文件后无需重启服务,`autofs` 会动态加载。
## 挂载案例
一、创建挂载点目录
```bash
[root@localhost ~]# mkdir /mnt/nfs
```
二、配置autofs自动挂载
```bash
# 编辑auto.master主配置文件
[root@localhost ~]# vim /etc/auto.master
/mnt/nfs /etc/auto.nfs
[root@localhost ~]# systemctl restart autofs
# 编辑挂载映射文件
[root@localhost ~]# vim /etc/auto.nfs
share -fstype=nfs4,rw,soft 192.168.88.10:/myshare
```
三、验证挂载
```bash
# 访问挂载点以触发自动挂载
[root@localhost ~]# ls /mnt/nfs/share
dir file file1
[root@localhost ~]# cd /mnt/nfs/share/
[root@localhost share]# ls
dir file file1
[root@localhost share]# cat file
Hello, This is server2
```
### 其他配置选项
在挂载映射文件中可以使用多种选项,以下是常用参数的详细说明:
#### 文件系统类型选项 (`-fstype=`)
- **nfs**:适用于 NFSv3 文件系统。
- **nfs4**:适用于 NFSv4 文件系统。
#### 挂载选项
- **rw**:读写权限。
- **ro**:只读权限。
- **soft**:允许客户端在超时后返回错误。
- **hard**:客户端会一直尝试连接,直到服务器恢复正常。
- **intr**:允许中断挂载操作(NFSv3 使用)。
- **timeo=**:超时时间(默认 600 分钟)。
- **bg**:后台挂载操作。
### 变量支持
映射文件中可以使用变量。例如:
```bash
* -fstype=nfs4,rw 192.168.88.10:/myshare/&
```
在此配置中,`*` 代表通配符,`&` 将被替换为对应挂载点名称。例如,访问 `/mnt/nfs/test` 时将挂载 `192.168.88.10:/myshare/test`
# 实战案例
将NFS的共享目录,通过autofs 发布出来,做为远程主机用户的家目录
 ## 环境准备
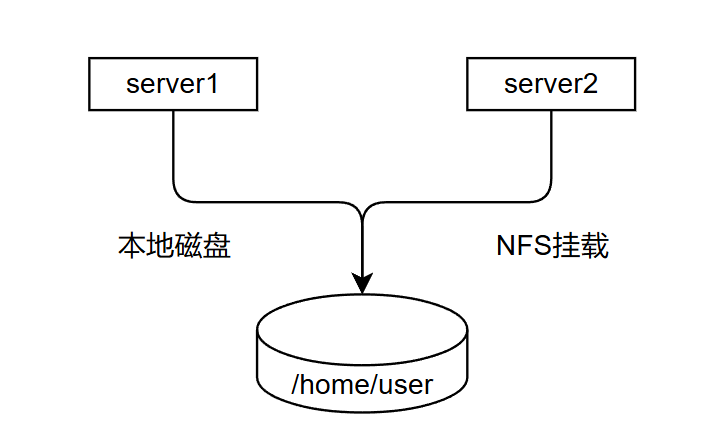
将server1中的用户家目录共享出来,server2在登录相同用户的时候,看到的家目录下的文件是一致的
## 实验过程
一、NFS服务器(server1)创建用户和对应的目录,将用户user01的家目录共享出来
```bash
[root@localhost ~]# mkdir /data
[root@localhost ~]# useradd -d /data/user01 user01
[root@localhost ~]# id user01
uid=1000(user01) gid=1000(user01) groups=1000(user01)
[root@localhost ~]# vim /etc/exports
[root@localhost ~]# cat /etc/exports
# /myshare 192.168.88.0/24(rw,sync,root_squash,no_all_squash)
/data/user01 192.168.88.0/24(rw,sync,anonuid=1000,anongid=1000,all_squash)
[root@localhost ~]# exportfs -r
[root@localhost ~]# exportfs -v
/data/user01 192.168.88.0/24(sync,wdelay,hide,no_subtree_check,anonuid=1000,anongid=1000,sec=sys,rw,secure,root_squash,all_squash)
```
二、在NFS客户端(server2)中配置autofs
```bash
[root@localhost ~]# vim /etc/auto.master
/- /etc/auto.user
[root@localhost ~]# vim /etc/auto.user
[root@localhost ~]# cat /etc/auto.user
/data/user01 -fstype=nfs4,rw,soft 192.168.88.10:/data/user01
[root@localhost ~]# systemctl restart autofs
```
三、在server2中创建user01用户
```bash
[root@localhost ~]# useradd -d /data/user01 -u 1000 user01
useradd: warning: the home directory /data/user01 already exists.
useradd: Not copying any file from skel directory into it.
```
四、测试
```bash
# 在server1中,登录到user01用户创建一个文件
[root@localhost ~]# su - user01
[user01@localhost ~]$ echo "The file is created by server1-user01" > file
# 在server2中,登录到user01用户查看是否共享了该文件
[root@localhost ~]# su - user01
[user01@localhost ~]$ ls
file
[user01@localhost ~]$ cat file
The file is created by server1-user01
[user01@localhost ~]$ pwd
/data/user01
# 检查server2中挂载情况
[user01@localhost ~]$ df -h
df: /mnt/nfs/share: Stale file handle
Filesystem Size Used Avail Use% Mounted on
devtmpfs 4.0M 0 4.0M 0% /dev
tmpfs 872M 0 872M 0% /dev/shm
tmpfs 349M 6.6M 343M 2% /run
/dev/mapper/rl-root 17G 1.7G 16G 10% /
/dev/nvme0n1p1 960M 261M 700M 28% /boot
tmpfs 175M 0 175M 0% /run/user/0
192.168.88.10:/data/user01 17G 1.7G 16G 10% /data/user01
```
五、总结
从该实验结果中可以看出,我们通过nfs和autofs工具的配合使用,实现了两台主机共享同一个目录的效果。
NFS工具主要目的在于将远程存储设备共享出来,其他主机能够将分享出来的目录进行挂载。达到跟使用自己本地硬盘一样的效果。有效的解决了本地硬盘空间不足,部分文件需要共享,数据存储持久化等问题。是目前企业里使用较多的文件共享服务器最佳实践方案。
## 环境准备
将server1中的用户家目录共享出来,server2在登录相同用户的时候,看到的家目录下的文件是一致的
## 实验过程
一、NFS服务器(server1)创建用户和对应的目录,将用户user01的家目录共享出来
```bash
[root@localhost ~]# mkdir /data
[root@localhost ~]# useradd -d /data/user01 user01
[root@localhost ~]# id user01
uid=1000(user01) gid=1000(user01) groups=1000(user01)
[root@localhost ~]# vim /etc/exports
[root@localhost ~]# cat /etc/exports
# /myshare 192.168.88.0/24(rw,sync,root_squash,no_all_squash)
/data/user01 192.168.88.0/24(rw,sync,anonuid=1000,anongid=1000,all_squash)
[root@localhost ~]# exportfs -r
[root@localhost ~]# exportfs -v
/data/user01 192.168.88.0/24(sync,wdelay,hide,no_subtree_check,anonuid=1000,anongid=1000,sec=sys,rw,secure,root_squash,all_squash)
```
二、在NFS客户端(server2)中配置autofs
```bash
[root@localhost ~]# vim /etc/auto.master
/- /etc/auto.user
[root@localhost ~]# vim /etc/auto.user
[root@localhost ~]# cat /etc/auto.user
/data/user01 -fstype=nfs4,rw,soft 192.168.88.10:/data/user01
[root@localhost ~]# systemctl restart autofs
```
三、在server2中创建user01用户
```bash
[root@localhost ~]# useradd -d /data/user01 -u 1000 user01
useradd: warning: the home directory /data/user01 already exists.
useradd: Not copying any file from skel directory into it.
```
四、测试
```bash
# 在server1中,登录到user01用户创建一个文件
[root@localhost ~]# su - user01
[user01@localhost ~]$ echo "The file is created by server1-user01" > file
# 在server2中,登录到user01用户查看是否共享了该文件
[root@localhost ~]# su - user01
[user01@localhost ~]$ ls
file
[user01@localhost ~]$ cat file
The file is created by server1-user01
[user01@localhost ~]$ pwd
/data/user01
# 检查server2中挂载情况
[user01@localhost ~]$ df -h
df: /mnt/nfs/share: Stale file handle
Filesystem Size Used Avail Use% Mounted on
devtmpfs 4.0M 0 4.0M 0% /dev
tmpfs 872M 0 872M 0% /dev/shm
tmpfs 349M 6.6M 343M 2% /run
/dev/mapper/rl-root 17G 1.7G 16G 10% /
/dev/nvme0n1p1 960M 261M 700M 28% /boot
tmpfs 175M 0 175M 0% /run/user/0
192.168.88.10:/data/user01 17G 1.7G 16G 10% /data/user01
```
五、总结
从该实验结果中可以看出,我们通过nfs和autofs工具的配合使用,实现了两台主机共享同一个目录的效果。
NFS工具主要目的在于将远程存储设备共享出来,其他主机能够将分享出来的目录进行挂载。达到跟使用自己本地硬盘一样的效果。有效的解决了本地硬盘空间不足,部分文件需要共享,数据存储持久化等问题。是目前企业里使用较多的文件共享服务器最佳实践方案。