# 1. ansible自动化运维
## 1.1 ansible介绍
ansible 是一个开源的自动化运维工具,主要用于系统配置管理、应用部署、任务编排等场景。它使用 YAML 语法编写配置文件,语法简单易懂,学习曲线平缓。ansible 的任务是幂等的,意味着多次执行结果是一致的,不会产生意外结果,非常适合于持续部署和集成。
ansible 支持众多常见操作系统和中间件,具有良好的扩展性。同时它还支持自定义模块,可以满足各种复杂的自动化需求。另一个特点是 ansible 不需要在远程主机上安装任何代理,只需要有 SSH 访问权限即可,并且不需要中央控制节点,使用 SSH 协议直接连接远程主机,部署和维护相对简单。ansible 使用 SSH 进行远程连接和命令执行,保证了数据传输的安全性。
ansible由python开发,集合了众多自动化运维工具的优点,实现了批量系统部署、批量程序部署,批量运行命令等功能。ansible是基于模块工作的,本身没有批量部署的能力,真正具有批量部署能力的是ansible运行的模块,ansible只是提供一个框架。
## 1.2 核心组件
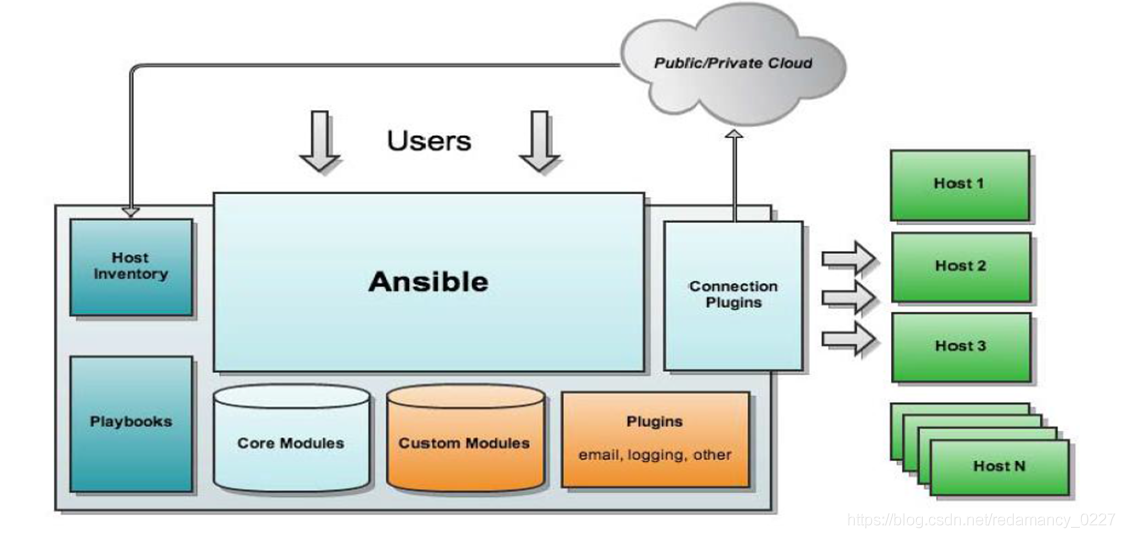
ansible:ansible核心程序。 HostInventory:记录由ansible管理的主机信息,包括端口、密码、ip等。 Playbooks:“剧本”YAML格式文件,多个任务定义在一个文件中,定义主机需要调用哪些模块来完成的功能。 CoreModules:核心模块,主要操作是通过调用核心模块来完成管理任务。 CustomModules:自定义模块,完成核心模块无法完成的功能,支持多种语言。 ConnectionPlugins:连接插件,ansible和Host通信使用
## 1.3 任务执行方式
- ad-HOC 点对点模式 使用单个模块,支持批量执行单条命令。ad-hoc 命令是一种可以快速输入的命令 例如对大量服务器执行shell 或者执行某个linux命令。
- playbook 模式(剧本模式) 通过编写yaml格式文件组合多个task任务,实现一个想要达到的功能,相对于多个点对点模式组合操作配置,playbook这个功能非常强大
## 1.4 特点
- 不需要在被监控端上安装任何服务程序
- 无服务器端,使用时直接运行命令即可
- 基于模块工作,可以使用任意语言开发
- 使用yaml语言编写playbook
- 基于ssh工作
- 可实现多级指挥
- 具有幂等性,一种操作重复多次执行结果相同
## 1.5 执行过程
- 加载自己的配置文件,默认为/etc/ansible/ansible.cfg
- 加载自己对应的模块文件
- 通过ansible将模块或命令生成对应的临时py文件,并将该文件传输至远程服务器
- 对应执行用户的家目录的.ansible/tmp/xx.py文件
- 给文件+x执行
- 执行并将返回结果,删除临时py文件,然后退出
# 2. ansible部署
- 安装ansible
```
[root@localhost ~]# yum install -y epel-release
[root@localhost ~]# yum install -y ansible
```
**说明:**ansible只是一个工具,不需要启动,安装好以后,直接使用即可。并且只有服务端需要安装,客户端不需要安装....
## 2.1 参数说明
```
`Inventory 文件参数:
-i 或 --inventory: 指定 Inventory 文件的路径
-l 或 --limit: 限制操作的主机范围
-g 或 --groups: 指定要操作的主机组
`剧本(Playbook)参数:
-p 或 --playbook-dir: 指定 Playbook 所在目录
-e 或 --extra-vars: 传递额外的变量
`任务(Task)参数:
-m 或 --module-name: 指定要使用的模块名称
-a 或 --args: 传递模块的参数
`连接参数:
-c 或 --connection: 指定连接类型,如 ssh、local 等
-u 或 --user: 指定远程连接的用户
`输出参数:
-v 或 --verbose: 增加输出信息的详细程度
--check: 进行一次"试运行",不会实际改变任何状态
--diff: 显示配置文件的改动情况
`其他参数:
-f 或 --forks: 指定并行执行的进程数
-t 或 --tags: 只执行带有指定 tag 的任务
--list-hosts: 列出受管主机
--list-tasks: 列出所有任务
```
## 2.2 快速开始
**实验环境:**四台Linux虚拟机,HOSTNAME分别为:ansible、server1、server2、server3
其中,ansible做为服务端,其他server均作为客户端
1. 免密登录
```
# 在ansible上修改hosts文件,方便使用主机名管理主机
[root@ansible ~]# vim /etc/hosts
.......
192.168.88.10 server1
192.168.88.20 server2
192.168.88.30 server3
# 生成密钥对
[root@ansible ~]# ssh-keygen -P "" -t rsa
.....
# 将公钥发送给需要被管理端,以实现免密登录
[root@ansible ~]# ssh-copy-id -i /root/.ssh/id_rsa.pub root@server1
[root@ansible ~]# ssh-copy-id -i /root/.ssh/id_rsa.pub root@server2
[root@ansible ~]# ssh-copy-id -i /root/.ssh/id_rsa.pub root@server3
```
### 2.2.1 常用工具
- ansible:临时命令执行工具,常用于执行临时命令
- ansible-doc:常用于模块功能的查询
- ansible-playbook:用于执行剧本
### 2.2.2 主要配置文件
- /etc/ansible/ansible.cfg:主配置文件
- /etc/ansible/hosts:主机清单文件
- /etc/ansible/roles:角色目录
### 2.2.3 配置主机清单
编辑`/etc/ansible/hosts`文件,再最后面添加上被管理端
```
[root@ansible ~]# vim /etc/ansible/hosts
......
......
......
## [dbservers]
##
## db01.intranet.mydomain.net
## db02.intranet.mydomain.net
## 10.25.1.56
## 10.25.1.57
# Here's another example of host ranges, this time there are no
# leading 0s:
## db-[99:101]-node.example.com
# 定义自己的主机组
[all_servers]
server1
server2
server3
[node1]
server1
[node2]
server2
[node3]
server3
```
- 主配置文件`ansible.cfg`,默认可以不用改
```
[root@localhost ~]# vim /etc/ansible/ansible.cfg
[defaults]
# some basic default values...
#inventory = /etc/ansible/hosts # 定义主机清单文件
#library = /usr/share/my_modules/ # 库文件的存放位置
#module_utils = /usr/share/my_module_utils/
#remote_tmp = ~/.ansible/tmp # 生成的临时py文件在远程主机的目录
#local_tmp = ~/.ansible/tmp # 生成的临时py文件在本地主机的目录
#plugin_filters_cfg = /etc/ansible/plugin_filters.yml
#forks = 5 # 默认的并发数
#poll_interval = 15 # 默认的线程池
#sudo_user = root # 默认的sudo用户
#ask_sudo_pass = True
#ask_pass = True
#transport = smart
#remote_port = 22
#module_lang = C
#module_set_locale = False
transport = smart
在ansible配置中,transport = smart 是指定 ansible 用于远程连接的传输机制。smart 是 ansible 的默认传输选项,它会尝试根据环境自动选择最佳的传输机制。
当 smart 被设置时,ansible 会按照以下顺序尝试不同的传输机制:
如果已经建立了 SSH 连接(例如,通过 SSH Agent 或者在 ansible.cfg 中配置了 SSH 连接参数),则使用 SSH 传输。
如果未建立 SSH 连接,并且目标主机是本地主机,则使用本地传输(即直接在本地执行命令)。
如果未建立 SSH 连接,并且目标主机是远程主机,则使用 Paramiko 传输(基于 Python 的 SSH2 实现)。
通过使用 smart 选项,ansible 可以自动选择合适的传输机制,以确保在不同的环境中都能正常工作。如果您希望显式地指定传输机制,可以将 transport 设置为 ssh、local 或 paramiko,以强制使用相应的传输方式。
```
### 2.2.4 执行状态
ansible的执行状态
- 绿色:执行成功并且不需要做改变的操作
- 黄色:执行成功并且对目标主机做变更
- 红色:执行失败
- 粉色:警告信息
- 蓝色:显示ansible命令执行的过程
## 2.3 常用模块
### 2.3.1 ping模块
测试与主机的连通性
示例:
```
[root@ansible ~]# ansible -m ping all_servers
server1 | SUCCESS => {
"ansible_facts": {
"discovered_interpreter_python": "/usr/bin/python"
},
"changed": false,
"ping": "pong"
}
server3 | SUCCESS => {
"ansible_facts": {
"discovered_interpreter_python": "/usr/bin/python"
},
"changed": false,
"ping": "pong"
}
server2 | SUCCESS => {
"ansible_facts": {
"discovered_interpreter_python": "/usr/bin/python"
},
"changed": false,
"ping": "pong"
}
# 返回说明:
"SUCCESS" 表示 ansible 成功执行了任务,没有遇到错误。
"ansible_facts" 是一个包含 ansible 任务执行期间收集到的事实(facts)的字典。
"discovered_interpreter_python" 是一个收集到的事实,它指示目标主机上的 Python 解释器的路径为 /usr/bin/python。这对于后续的 ansible 任务可能需要使用 Python 的情况很有用。
"changed" 表示 ansible 是否对目标主机进行了更改。在这种情况下,值为 false 表示没有进行任何更改。
"ping" 是一个简单的回应,用于测试与目标主机的连通性。如果值为 "pong",表示与目标主机的连接正常。
```
### 2.3.2 Group模块
用户创建和修改用户组
示例:对node1主机组的成员创建一个IT组,组ID为111
```
[root@ansible ~]# ansible-doc -s group
action: group
gid # 设置组的GID号
name= # 管理组的名称
state # 指定组状态,默认为创建,设置值为absent为删除
system # 设置值为yes,表示为创建系统组
[root@ansible ~]# ansible -m group -a "name=IT gid=111 system=yes" node1
server1 | CHANGED => {
"ansible_facts": {
"discovered_interpreter_python": "/usr/bin/python"
},
"changed": true,
"gid": 111,
"name": "IT",
"state": "present",
"system": true
}
```
### 2.3.3 User模块
用于对用户的创建,修改和删除等操作
```
# 查看某个模块的具体用法
[root@ansible ~]# ansible-doc -l|wc -l
3387 #共有3387个模块
[root@ansible ~]# ansible‐doc ‐s user
comment # 用户的描述信息
createhom # 是否创建家目录
force # 在使用`state=absent'是, 行为与`userdel ‐‐force'一致.
group # 指定基本组
groups # 指定附加组,如果指定为('groups=')表示删除所有组
home # 指定用户家目录
name # 指定用户名
password # 指定用户密码
remove # 在使用 `state=absent'时, 行为是与 `userdel ‐‐remove'一致.
shell # 指定默认shell
state #设置帐号状态,不指定为创建,指定值为absent表示删除
system # 当创建一个用户,设置这个用户是系统用户。这个设置不能更改现有用户
uid #指定用户的uid
update_password # 更新用户密码
expires #指明密码的过期时间
......
```
示例:在主机组node1上创建一个系统用户张三,家目录为/home/zhangsan,uid为111,附加组为IT,以及给一个注释
```
[root@ansible ~]# ansible -m user -a "system=yes name=zhangsan home=/home/zhangsan uid=111 groups=IT comment='hello zhangsan'" node1
server1 | CHANGED => {
"ansible_facts": {
"discovered_interpreter_python": "/usr/bin/python"
},
"changed": true,
"comment": "hello zhangsan",
"create_home": true,
"group": 995,
"groups": "IT",
"home": "/home/zhangsan",
"name": "zhangsan",
"shell": "/bin/bash",
"state": "present",
"system": true,
"uid": 111
}
# 删除用户及家目录
[root@ansible ~]# ansible -m user -a "name=zhangsan state=absent remove=yes" node1
# 添加系统用户,指定uid、家目录、主组及注释、密码
[root@ansible ~]# ansible -m user -a "system=yes name=zhangsan home=/home/zhangsan uid=111 group=root comment='hello zhangsan' password='123456' shell=/bin/cbash " node1
```
### 2.3.4 Command模块
command模块是ansible默认使用的模块。不支持管道,变量及重定向等
示例:
```
[root@ansible ~]# ansible-doc ‐s command
......
......
[root@ansible ~]# ansible -a "touch /root/ansible.txt" all_servers
[WARNING]: Consider using the file module with state=touch rather than running
'touch'. If you need to use command because file is insufficient you can add
'warn: false' to this command task or set 'command_warnings=False' in
ansible.cfg to get rid of this message.
server2 | CHANGED | rc=0 >>
server1 | CHANGED | rc=0 >>
server3 | CHANGED | rc=0 >>
[root@ansible ~]# ansible -a "find / -name ifcfg-ens33" all_servers
server1 | CHANGED | rc=0 >>
/etc/sysconfig/network-scripts/ifcfg-ens33
server2 | CHANGED | rc=0 >>
/etc/sysconfig/network-scripts/ifcfg-ens33
server3 | CHANGED | rc=0 >>
/etc/sysconfig/network-scripts/ifcfg-ens33
```
### 2.3.5 Shell模块
在远程主机上执行bash命令
相对于command而言,支持性更好一点,但是对于某些复杂的命令,也可能会执行失败
解决方法:可以把命令卸载脚本中,使用script模块执行脚本到远程主机
```
[root@ansible ~]# ansible -m shell -a "hostname" all_servers
server1 | CHANGED | rc=0 >>
server1
server2 | CHANGED | rc=0 >>
server2
server3 | CHANGED | rc=0 >>
server3
```
### 2.3.6 Script模块
可以发送shell脚本到远程主机上并执行
示例:
```
[root@ansible ~]# vim test.sh
#!/bin/bash
for i in `seq 5`
do
touch /root/test_${i}.txt
done
# script模块
[root@ansible ~]# ansible -m script -a "/root/test.sh" node2
server2 | CHANGED => {
"changed": true,
"rc": 0,
"stderr": "Shared connection to server2 closed.\r\n",
"stderr_lines": [
"Shared connection to server2 closed."
],
"stdout": "",
"stdout_lines": []
}
# server2验证
[root@server2 ~]# ls
anaconda-ks.cfg test_1.txt test_3.txt test_5.txt
ansible.txt test_2.txt test_4.txt
# 参数说明
chdir参数: 此参数的作用就是指定一个远程主机中的目录,在执行对应的脚本之前,会先进入到 chdir 参数指定的目录中。
creates参数: 使用此参数指定一个远程主机中的文件,当指定的文件存在时,就不执行对应脚本
removes参数: 使用此参数指定一个远程主机中的文件,当指定的文件不存在时,就不执行对应脚本
```
### 2.3.7 Copy模块
用于向复制文件到主机组中
参数解释:
```
[root@ansible ~]# ansible-doc -s copy
backup:在覆盖之前,将源文件备份,备份文件包含时间信息。
content:用于替代“src”,可以直接设定指定文件的值
dest:必选项。要将源文件复制到的远程主机的绝对路径
directory_mode:递归设定目录的权限,默认为系统默认权限
force:强制覆盖目的文件内容,默认为yes
others:所有的file模块里的选项都可以在这里使用
src:被复制到远程主机的本地文件,可以是绝对路径,也可以是相对路径。如果路径是一个目录,它将递归复制
ansible -m copy -a "src=/本地文件 dest=/远程文件" nodes
```
示例:
- 在创建文件时修改文件的属主和属组信息
```
[root@ansible ~]# ansible -m copy -a "src=/root/test.sh dest=/root/test1 owner=zhangsan group=ansibles" node1
```
- 在传输文件时修改文件的权限信息,并且备份远程主机文件
```
[root@ansible ~]# ansible -m copy -a "src=/root/test.sh dest=/root/test2 backup=yes mode=777" node1
```
- 创建一个文件并直接编辑文件
```
[root@ansible ~]# ansible -m copy -a "content='hello ansibles\n' dest=/root/test3" node1
```
### 2.3.8 File模块
用于对文件进行相关操作
参数解释:
```
[root@ansible ~]# ansible‐doc ‐s file
‐ name: Sets attributes of files
force:需要在两种情况下强制创建软链接,一种是源文件不存在,但之后会建立的情况下;另一种是目标软链接已存在,需要先取消之前的软链,然后创建新的软链,有两个选项:yes|no
group:定义文件/目录的属组
mode:定义文件/目录的权限
owner:定义文件/目录的属主
path:必选项,定义文件/目录的路径
recurse:递归设置文件的属性,只对目录有效
src:被链接的源文件路径,只应用于state=link的情况
dest:被链接到的路径,只应用于state=link的情况
state:
absent: 删除文件
directory:如果目录不存在,就创建目录
file:验证文件是否存在,即使文件不存在,也不会被创建
link:创建软链接
hard:创建硬链接
touch:如果文件不存在,则会创建一个新的文件,如果文件或目录已存在,则更新其后修改时间
```
示例:
- 创建目录
```
[root@ansible ~]# ansible -m file -a "name=test1 owner=root group=root mode=644 state=directory " node1
```
- 创建文件
```
[root@ansible ~]# ansible -m file -a "path=/root/test2 owner=root group=root mode=644 state=touch" node1
```
- 删除文件/目录
```
[root@ansible ~]# ansible -m file -a "path=/root/test2 state=absent" node1
```
- 创建软链接文件
```
[root@ansible ~]# ansible -m file -a "src=/root/test1 dest=/root/test2 state=link" node1
```
- 创建硬链接文件
```
[root@ansible ~]# ansible -m file -a "src=/root/test.txt dest=/root/test2 state=hard" node2
```
### 2.3.9 Yum模块
用于远程操作主机下载软件包
参数说明:
```
[root@ansible ~]# ansible‐doc ‐s yum
conf_file #设定远程yum安装时所依赖的配置文件。如配置文件没有在默认的位置。
disable_gpg_check #是否禁止GPG checking,只用于`present' or `latest'。
disablerepo #临时禁止使用yum库。 只用于安装或更新时。
enablerepo #临时使用的yum库。只用于安装或更新时。
name= #所安装的包的名称
state #present安装, latest安装最新的, absent 卸载软件。
update_cache #强制更新yum的缓存
```
示例:
```
[root@ansible ~]# ansible -m yum -a "name=httpd state=latest" node3
server3 | CHANGED => {
"ansible_facts": {
"discovered_interpreter_python": "/usr/bin/python"
},
"changed": true,
"changes": {
"installed": [
"httpd"
],
"updated": []
},
"msg": "",
"rc": 0,
```
### 2.3.10 Service模块
用于远程管理主机上的service服务类
参数说明:
```
[root@ansible ~]# ansible-doc -s service
> SERVICE (/usr/lib/python2.7/site‐packages/ansible/modules/system/service.py)
Controls services on remote hosts. Supported init systems include BSD init, OpenRC, SysV, Solaris
SMF, systemd, upstart. For Windows targets, use the [win_service] module instead.
* note: This module has a corresponding action plugin.
......
......
arguments #命令行提供额外的参数
enabled #设置开机启动,可以设置为yes或者no。
name= #服务名称
runlevel #开机启动的级别,一般不用指定。
sleep #在重启服务的过程中,是否等待。如在服务关闭以后等待2秒再启动。
state #started启动服务, stopped停止服务, restarted重启服务, reloaded重载配置
```
示例:
```
[root@ansible ~]# ansible -m service -a "name=httpd state=started" node3
server3 | CHANGED => {
"ansible_facts": {
"discovered_interpreter_python": "/usr/bin/python"
},
"changed": true,
"name": "httpd",
"state": "started"
.....
.....
```
### 2.3.11 Selinux模块
用于管理远程主机的selinux设置
参考说明:
```
[root@node1 ~]# ansible-doc -s selinux
# selinux模块针对selinux的修改操作是针对配置文件进行修改的
‐ name: Change policy and state of SELinux
configfile:
描述: SELinux 配置文件的路径,如果不是标准路径。
参数类型: 字符串
policy:
描述: 要使用的 SELinux 策略的名称。
参数类型: 字符串
state:
描述: (必需) SELinux 的模式。
参数类型: 字符串
可选值:
enforcing: 强制 SELinux 策略生效。
permissive: 以警告模式运行 SELinux,不会阻止任何操作。
disabled: 完全禁用 SELinux。
```
示例:
```
[root@ansible ~]# ansible -m selinux -a "state=enforcing policy=targeted" node1
[WARNING]: Reboot is required to set SELinux state to 'enforcing'
server1 | CHANGED => {
"ansible_facts": {
"discovered_interpreter_python": "/usr/bin/python"
},
"changed": true,
"configfile": "/etc/selinux/config",
"msg": "Config SELinux state changed from 'disabled' to 'enforcing'",
"policy": "targeted",
"reboot_required": true,
"state": "enforcing"
}
```
# 3. Playbook(剧本)
## 3.1 介绍
Ansible playbook是一种可执行的YAML文件,用于描述如何部署和配置一个系统或应用程序。一个playbook由一个或多个play组成,每个play都针对特定的主机或主机组执行一系列任务。
一个playbook的基本结构如下:
```
- hosts: all
vars:
package_name: nginx
config_file: /etc/nginx/nginx.conf
tasks:
- name: Install Nginx
yum:
name: "{{ package_name }}"
state: present
- name: Copy Nginx configuration
copy:
src: nginx.conf
dest: "{{ config_file }}"
notify:
- restart nginx
handlers:
- name: restart nginx
service:
name: nginx
state: restarted
```
在上面的例子中,我们定义了以下几个主要字段:
- `hosts`: 指定要运行任务的主机或主机组。
- `vars`: 定义要在playbook中使用的变量。
- `tasks`: 定义要执行的任务列表。每个任务都有一个名称和一个模块。
- `handlers`: 定义当某些任务触发时需要执行的处理程序,比如重启服务。
执行playbook剧本:
`ansible-playbook xxxxx.yaml`即可
## 3.2 快速开始
### 3.2.1 案例:服务安装
安装nginx并且修改配置文件
1. 先编写一个nginx的子配置文件
```
[root@ansible ~]# mkdir -p playbook/conf
[root@ansible ~]# cd playbook/conf
[root@ansible conf]# cat site.conf
server {
listen 666;
server_name localhost;
location / {
root /data;
index index.html
}
}
```
1. 编写playbook,要求是为目标机器安装nginx并且拷贝配置文件到该机器上,然后启动nginx。
```
[root@ansible playbook]# vim nginx.yaml
- name: install nginx web server
hosts: node1
remote_user: root
tasks:
- name: Install epel-release
yum:
name: epel-release
state: latest
- name: Install Nginx
yum:
name: nginx
state: latest
- name: Copy conf to nginx.conf.d
copy:
src: /root/playbook/conf/site.conf
dest: /etc/nginx/conf.d/site.conf
- name: Create "data" directory
file:
name: /data
state: directory
- name: Start Nginx service
service:
name: nginx
state: started
- name: create web index file
shell: echo "Install Nginx use Ansible...." > /data/index.html
```

## 3.3 高级配置
### 3.3.1 fact(事实变量)
Ansible 内置了大量的事实(fact)变量,可以在 Playbook 中使用。这些事实变量可以帮助我们更好地了解目标主机的环境和配置信息,从而编写更加智能和动态的自动化脚本。
常用的内置事实变量包括:
1. **操作系统信息**:
- `ansible_distribution`: 操作系统发行版名称,如 "CentOS"、"Ubuntu"
- `ansible_distribution_version`: 操作系统版本号
- `ansible_os_family`: 操作系统家族,如 "RedHat"、"Debian"
- `ansible_kernel`: 内核版本
2. **硬件信息**:
- `ansible_processor`: CPU 型号
- `ansible_processor_vcpus`: 虚拟 CPU 核数
- `ansible_memtotal_mb`: 内存总量(MB)
- `ansible_architecture`: CPU 架构,如 "x86_64"
3. **网络信息**:
- `ansible_default_ipv4`: 默认 IPv4 地址和网关
- `ansible_all_ipv4_addresses`: 所有 IPv4 地址
- `ansible_interfaces`: 所有网络接口名称
- `ansible_hostname`: 主机名
4. **其他信息**:
- `ansible_user_id`: 当前执行 Ansible 的用户 ID
- `ansible_date_time`: 主机当前日期和时间
- `ansible_env`: 主机环境变量
- `ansible_play_hosts`: 当前 play 中涉及的所有主机
这些事实变量可以帮助我们编写出更加智能和定制化的 Playbook。比如,我们可以根据操作系统的不同,执行不同的软件包安装任务;根据 CPU 架构,选择合适的软件包版本;根据内存大小,调整应用程序的配置等。
### 3.3.2 循环迭代
在playbook中,可以使用循环进行数据的迭代。这样一个模块就可以执行多次任务,因为往往我们部署一个服务的时候,都需要安装多个软件包的。
示例:使用yum循环安装软件包
```
- name: Install packages
yum:
name: "{{ item }}"
state: present
loop:
- nginx
- mysql
- php
```
或者:
```
- name: Install packages
yum:
name: "{{ item }}"
state: present
with_items:
- httpd
- mysql
- php
```
这样就可以实现一个yum安装多个软件包了,避免了playbook过于臃肿。
#### 3.3.2.1 RHCE真题讲解(2023-10)
创建一个名为 /home/student/ansible/packages.yml的 playbook:
1. 将 php 和 mariadb 软件包安装到 dev、test 和 prod 主机组中的主机上
2. 将 Development Tools 软件包组安装到 dev 主机组中的主机上
3. 将 dev 主机组中主机上的所有软件包更新为最新版本
```
[root@ansible ~]# vim playbook/packages.yml
- name: install pkgs
hosts: dev,test,prod
tasks:
- name: install mariadb php
yum:
name: "{{ item }}"
state: present
loop:
- php
- mariadb
- name: install group pkgs
hosts: dev
tasks:
- name: install Development Tools
yum:
name: "@Development Tools"
state: present
- name: update pkgs
hosts: dev
tasks:
- name: update pkgs
yum:
name: "*"
state: latest
```
#### 3.3.2.2 案例:循环创建用户
循环创建用户,用户信息如下 名称、组、家目录、shell、描述信息 zhangsan xsb /home/xsb/zhangsan /bin/bash 销售 lisi xsb /home/xsb/lisi /bin/bash 销售 wangwu jsb /home/jsb/wangwu /bin/sh java工程师 maliu jsb /home/jsb/maliu /bin/sh linux工程师 zhaoqi cwb /home/cwb/zhaoqi /bin/sh 会计
循环创建出以上用户并指定用户信息:
```
[root@ansible ~]# vim playbook/user.yml
- name: Manage user
hosts: node1
remote_user: root
tasks:
- name: Ensure groups xsb, jsb, cwb exist
group:
name: "{{ item.group }}"
with_items:
- { group: xsb }
- { group: jsb }
- { group: cwb }
- name: Create users zhangsan, lisi, wangwu, maliu, zhaoqi
user:
name: "{{ item.name }}"
group: "{{ item.group }}"
shell: "{{ item.shell }}"
comment: "{{ item.comment }}"
home: "{{ item.home }}"
with_items:
- { name: 'zhangsan', group: 'xsb', home: '/home/xsb/zhangsan', shell: '/bin/bash', comment: '销售' }
- { name: 'lisi', group: 'xsb', home: '/home/xsb/lisi', shell: '/bin/bash', comment: '销售' }
- { name: 'wangwu', group: 'jsb', home: '/home/jsb/wangwu', shell: '/bin/sh', comment: 'java工程师' }
- { name: 'maliu', group: 'jsb', home: '/home/jsb/maliu', shell: '/bin/sh', comment: 'linux工程师' }
- { name: 'zhaoqi', group: 'cwb', home: '/home/cwb/zhaoqi', shell: '/bin/sh', comment: '会计' }
```
### 3.3.3 条件判断
在 Ansible Playbook 中,我们可以使用条件判断语句来根据不同的条件执行不同的任务。
**when 语句:**
`when` 语句是最常用的条件判断语句。它可以根据变量的值、事实(facts)或者 Jinja2 表达式来决定是否执行某个任务。
```
- name: Install packages on CentOS 7
yum:
name:
- httpd
- mariadb-server
state: present
when: ansible_distribution == 'CentOS' and ansible_distribution_major_version|int == 7
- name: Install packages on CentOS 8
yum:
name:
- nginx
- mysql-server
state: present
when: ansible_distribution == 'CentOS' and ansible_distribution_major_version|int == 8
```
在这个例子中:
1. 第一个任务会在 CentOS 7 系统上安装 httpd 和 mariadb-server 软件包。`when` 语句确保了只有在 `ansible_distribution` 等于 'CentOS' 且 `ansible_distribution_major_version` 等于 7 时,这个任务才会执行。
2. 第二个任务会在 CentOS 8 系统上安装 nginx 和 mysql-server 软件包。同样的,`when` 语句确保了只有在 `ansible_distribution` 等于 'CentOS' 且 `ansible_distribution_major_version` 等于 8 时,这个任务才会执行。
#### 3.3.3.1 RHCE真题讲解(2023-10-)
**考试原题(第八题):**
创建一个名为/home/student/ansible/parted.yml 的playbook,它将在dev主机组上运行下列任务
1. 如果磁盘/dev/vdd存在,则创建1500m分区
2. 如果无法创建请求的分区大小,应显示错误消息 Could not create partition of that size,并且应改为使用大小 800m。
3. 如果磁盘/dev/vdd不存在 ,应显示错误消息 disk /dev/vdd does not exist。
4. 如果磁盘/dev/vdb存在,则创建1500m分区
5. 如果无法创建请求的分区大小,应显示错误消息 Could not create partition of that size,并且应改为使用大小 800m。
6. 最后分区都要格式化为ext4文件系统,并挂载在/mnt/fs01上
**简化题目:**在所有机器上创建sdb1分区,大小为1Gib,前提是sdb存在,如果不存在,请提示.......
```
[root@ansible playbook]# vim disk.yaml
- name: Create sdb1 partition
hosts: all_servers
tasks:
- name: Check if sdb block device exists
stat:
path: /dev/sdb
register: sdb_stat
- name: Create 1GB partition on sdb
parted:
device: /dev/sdb
number: 1
state: present
part_end: 1GB
when: sdb_stat.stat.exists
- name: sdb block device not exists
debug:
msg: "sdb block device does not exist, cannot create partition."
when: not sdb_stat.stat.exists
# Output:
TASK [Create 1GB partition on sdb] ************************************ *********
skipping: [server1]
skipping: [server3]
changed: [server2]
TASK [sdb block device not exists] ************************************ *********
ok: [server1] => {
"msg": "sdb block device does not exist, cannot create partition."
}
skipping: [server2]
ok: [server3] => {
"msg": "sdb block device does not exist, cannot create partition."
}
```
**验证:**
```
[root@server2 ~]# lsblk
NAME MAJ:MIN RM SIZE RO TYPE MOUNTPOINT
sda 8:0 0 20G 0 disk
├─sda1 8:1 0 1G 0 part /boot
└─sda2 8:2 0 19G 0 part
├─centos-root 253:0 0 17G 0 lvm /
└─centos-swap 253:1 0 2G 0 lvm [SWAP]
sdb 8:16 0 2G 0 disk
└─sdb1 8:17 0 953M 0 part
sr0 11:0 1 918M 0 rom
```
## 3.4 Jinjia2模板
Jinja2是一个功能强大的Python模板引擎,它被广泛应用于Ansible的playbook中。Jinja2模板语法提供了丰富的功能,使得在playbook中插入动态内容变得更加容易和灵活。
简单来讲,就是将原本静态的playbook转变为动态的。
### 3.4.1 RHCE真题讲解(2023-10)
**原题(第九题):**生成主机文件
1. 编写模板文件/home/student/ansible/hosts.j2 ,针对每个清单主机包含一行内容,其格式与 /etc/hosts 相同。
2. 创建名为 /home/student/ansible/hosts.yml 的playbook,它将使用此模板在 dev 主机组中的主 机上生成文件 /etc/myhosts。
3. 该 playbook 运行后,dev 主机组中主机上的文件/etc/myhosts 应针对每个受管主机包含一行内 容。
**题目变更如下:**
我们使用jinjia2和ansible内置变量动态的生成hosts文件,并且发送给远程主机
1. 编写模板文件
```
[root@ansible playbook]# vim hosts.j2
127.0.0.1 localhost localhost.localdomain localhost4 localhost4.localdomain4
::1 localhost localhost.localdomain localhost6 localhost6.localdomain6
{% for host in groups.all_servers %}
{{hostvars[host].ansible_ens33.ipv4.address}} {{hostvars[host].ansible_hostname}}
{% endfor %}
```
1. 编写hosts.yaml剧本来渲染并且发送该模板文件到目标主机,使之替换原本的hosts
```
[root@ansible playbook]# vim hosts.yaml
- name: Config hosts file
hosts: all_servers
remote_user: root
tasks:
- name: copy hosts.j2 to group servers
template:
src: hosts.j2
dest: /etc/hosts
# 执行该playbook
[root@ansible playbook]# ansible-playbook hosts.yaml
```
1. 检查并验证:
```
[root@server1 ~]# cat /etc/hosts
127.0.0.1 localhost localhost.localdomain localhost4 localhost4.localdomain4
::1 localhost localhost.localdomain localhost6 localhost6.localdomain6
192.168.88.10 server1
192.168.88.20 server2
192.168.88.30 server3
```
### 3.4.2 案例:生成nginx配置文件
我们可以在playbook中自定义变量,然后更具自定义的变量使用jinjia2模板渲染nginx的配置文件
1. 先编写nginx.yaml剧本,在里面定义变量
```
[root@ansible ~]# mkdir ansible
[root@ansible ~]# cd ansible
[root@ansible ansible]# vim nginx.yaml
- name: nginx conf
hosts: node1
remote_user: root
vars:
nginx_vhosts:
- web1:
listen: 8080
root: "/var/www/nginx/web1/"
- web2:
listen: 8080
server_name: "web2.baidu.com"
root: "/var/www/nginx/web2/"
- web3:
listen: 8080
server_name: "web3.baidu.com"
root: "/var/www/nginx/web3/"
tasks:
- name: mkdir /data
file:
name: /data
state: directory
- name: template config
template:
src: /root/ansible/site.conf.j2
dest: /data/nginx.conf
```
1. 编写nginx子配置文件site.conf,子配置文件中使用jinjia2语法进行渲染
```
[root@ansible ansible]# vim site.conf.j2
{% for vhost in nginx_vhosts %}
server {
listen {{ vhost.listen }}
{% if vhost.server_name is defined %}
server_name {{ vhost.server_name }}
{% endif %}
root {{ vhost.root }}
}
{% endfor %}
```
1. server1上验证配置文件是否渲染成功
```
[root@server1 ~]# cat /data/nginx.conf
server {
listen 8080
root /var/www/nginx/web1/
}
server {
listen 8080
server_name web2.baidu.com
root /var/www/nginx/web2/
}
server {
listen 8080
server_name web3.baidu.com
root /var/www/nginx/web3/
}
```
# 4. Role(角色)
Ansible 中的 Role 是一种组织和重用代码的强大方式。角色可以帮助你将相关的任务、变量、文件等集中管理,使得代码更加模块化和可重用。
如果将所有的play都写在一个playbook中,很容易导致这个playbook文件变得臃肿庞大,且不易读。因此,可以将多个不同任务分别写在不同的playbook中,然后使用include将其包含进去即可。而role则是整合playbook的方式。无论是include还是role,其目的都是分割大playbook以及复用某些细化的play甚至是task。
## 4.1 目录结构
在角色中,将task,templates,handlers,files等内容都分开存放,然后再playbook中直接调用角色即可.....
```
[root@ansible roles]# tree apache/
apache/
├── defaults
│ └── main.yml
├── files
├── handlers
│ └── main.yml
├── meta
│ └── main.yml
├── README.md
├── tasks
│ └── main.yml
├── templates
├── tests
│ ├── inventory
│ └── test.yml
└── vars
└── main.yml
```
- `defaults/main.yml`: 定义角色的默认变量
- `handlers/main.yml`: 定义角色的处理程序
- `meta/main.yml`: 定义角色的元数据,如依赖关系、作者信息等
- `tasks/main.yml`: 定义角色的主要任务
- `templates/`: 存放角色使用的模板文件
- `tests/`: 存放角色的测试相关文件
- `vars/main.yml`: 定义角色的变量
## 4.2 初始化自定义Role
可以使用ansible-galaxy工具通过init选项初始化一个角色
```
[root@ansible roles]# ansible-galaxy init apache
- Role apache was created successfully
[root@ansible role]# ls apache/
defaults files handlers meta README.md tasks templates tests vars
```
## 4.3 案例:使用Role安装httpd
1. 初始化httpd角色
```
[root@ansible roles]# ansible-galaxy init httpd
- Role httpd was created successfully
[root@ansible role]# tree httpd/
httpd/
├── defaults
│ └── main.yml
├── files
├── handlers
│ └── main.yml
├── meta
│ └── main.yml
├── README.md
├── tasks
│ └── main.yml
├── templates
├── tests
│ ├── inventory
│ └── test.yml
└── vars
└── main.yml
8 directories, 8 files
```
1. 编写角色中的task
```
[root@ansible httpd]# vim tasks/main.yml
# tasks file for httpd
- name: Install httpd
yum:
name: httpd
state: present
- name: copy site2.conf to apache web server
copy:
src: site.conf
dest: /etc/httpd/conf.d/site2.conf
- name: create directory1 for apache web server
file:
name: /data/site1/
state: directory
- name: create directory2 for apache web server
file:
name: /data/site2/
state: directory
- name: Start httpd
service:
name: httpd
state: started
- name: Write index file
shell: echo "site1" > /data/site1/index.html && echo "site2" > /data/site2/index.html
```
1. 编写角色中的file
```
[root@ansible httpd]# vim files/site.conf
Listen 8080
Listen 9090
Require all granted
DocumentRoot "/data/site1/"
DocumentRoot "/data/site2/"
```
1. 编写一个playbook剧本调用该角色
```
[root@ansible roles]# vim httpd.yaml
- name: Install httpd web server
hosts: node1
roles:
- httpd
```
1. 验证
```
[root@server1 ~]# ss -nlt
State Recv-Q Send-Q Local Address:Port Peer Address:Port
LISTEN 0 128 *:22 *:*
LISTEN 0 100 127.0.0.1:25 *:*
LISTEN 0 128 :::8080 :::*
LISTEN 0 128 :::80 :::*
LISTEN 0 128 :::22 :::*
LISTEN 0 100 ::1:25 :::*
LISTEN 0 128 :::9090 :::*
```

## 4.4 RHCE真题讲解(2023-10)
**题目(第六题):**
根据下列要求,在 /home/student/ansible/roles中创建名为 apache 的角色:
1. httpd软件包已安装,设为在系统启动时启用
2. 防火墙已启用并正在运行,并使用允许访问 Web 服务器的规则
3. 模板文件 index.html.j2 已存在,用于创建具有以下输出的文件 /var/www/html/index.html: Welcome to HOSTNAME on IPADDRESS 其中,HOSTNAME 是受管节点的完全限定域名,IPADDRESS 则是受管节点的 IP 地址。
4. 按照下方所述,创建一个使用此角色的 playbook /home/student/ansible/newrole.yml: 该 playbook 在 webservers 主机组中的主机上运行
```bash
[student@workstation ansible# cd roles/
[student@workstation roles]# ansible-galaxy init apache
[student@workstation roles]# vim apache/tasks/main.yml
---
# tasks file for apache
- name: install http
yum:
name: httpd
state: present
- name: config system service
service:
name: "{{ item }}"
state: started
enabled: yes
loop:
- httpd
- firewalld
- name: firewalld service
firewalld:
zone: public
service: http
permanent: yes
immediate: yes
state: enabled
- name: user templates
template:
src: index.html.j2
dest: /var/www/html/index.html
[student@workstation roles]# vim apache/templates/index.html.j2
Welcome to {{ ansible_fqdn }} on {{ ansible_default_ipv4.address }}
[student@workstation roles]# cd ..
[student@workstation ansible]# vim newrole.yml
- name: use apache role
hosts: webservers
roles:
- apache
# 运行脚本
[student@workstation ansible]# ansible-playbook newrole.yml
# 访问测试
[student@workstation ansible]# curl serverc
Welcome to serverc.lab.example.com on 172.25.250.12
[student@workstation ansible]# curl serverd
Welcome to serverd.lab.example.com on 172.25.250.13
```